IBM Maximo Real Estate and Facilities · Application Builder · A guide for new MREF administrators
Your first MREF app: a Key Register from scratch
You have just joined a Maximo Real Estate and Facilities (MREF) team and someone says "can you add a small app for that?". This guide builds one, end to end, on a real MREF 9.2.2 system: a register of physical keys and the spaces each key opens. Every builder tool, every screen that matters, and every trap we fell into on the way.
Written for someone new to MREF. If you come from Maximo Manage, you already know most of the ideas under different names: the green In Maximo terms boxes translate each step for you.
- The six pieces of every MREF app and the builder tool for each one.
- How each MREF tool maps to the Maximo Manage application you already know.
- How to create a business object with fields, a name and a lifecycle, in the right module.
- How to link it to existing records with an association, and show the links on a form.
- How queries drive both the list screen and the related-records section of a form.
- How to write, publish, revise and debug a workflow.
- How to put the app on the menu with the Navigation Builder, and check it all from the Admin Console.
- Bonus: a small browser snippet that turns the builders' pop-up windows into in-page dialogs, and their alert boxes into messages.
Reading time: about 35 minutes. Doing it yourself: an afternoon. You need an MREF user with admin rights (we used system on a test system, never production).
The planSix pieces, six tools
An MREF application is not one thing. It is a set of building blocks, each made in its own builder tool, and each published separately. For our Key Register:
The record type: its fields (Key Number, Key Type, Copies), its name and its lifecycle.
The link between a key and the spaces (rooms) it opens.
The screen to view and edit one key, with a section listing its spaces.
One for the Key Register list, one for "Spaces This Key Opens" on the form.
Copies the key number into the standard ID field, so every list and lookup shows it.
A Master/Detail page on the administrator's home page.
Check what MREF already has. MREF ships a triKeyManagement module with key, key location and key-cut matrix objects. In a real project you would extend those, not build your own. Here we build a small object on purpose, to learn the tools, and we put it inside that module, for a reason you will see in Step 1.
Three house rules: give everything you create a prefix (we use cst for "custom"), never edit IBM's tri
objects directly, and work on a test system.
For Maximo peopleComing from Maximo? A translation table
MREF is IBM TRIRIGA, renamed and delivered on Maximo Application Suite. That is why IBM's own objects start with
tri (triSpace, triKeyManagement, triSave) and why the builder screens look different from Manage. The ideas, however,
are very close to what you know:
| You know this in Maximo Manage | In MREF it is | Where |
|---|---|---|
| Object and attributes in Database Configuration (table WORKORDER, attribute WONUM) | Business object and fields, grouped in a module (table T_CSTKEYITEM, field cstKeyNumberTX) | Data Modeler |
| Apply Configuration Changes | Publish the business object (runs in the background, no admin mode) | Data Modeler |
| Relationship (a SQL where clause between two objects) | Association: a named, two-way link stored as data between two records | Association Manager |
| Domains (ALN, synonym) | Lists and classifications | Lists, Classifications |
| Status and Change Status (a synonym domain such as WOSTATUS) | State transitions: every button (Save, Activate, Retire) is an action that moves the record between states | Data Modeler |
| Application Designer: tabs, sections, table windows | Form: tabs, sections, query sections | Form Builder |
| List tab, saved queries, where clauses | Queries (Query-type reports) drive every list and related-records section | Report Manager |
| Automation scripts on save, escalations, Workflow Designer | Workflows: one tool for record events, approvals and background processing | Workflow Builder |
| Go To Applications menu, Start Center | Navigation items and collections, home page portals | Navigation Builder, Portal Builder |
| Cron tasks | Agents (WFAgent, SchedulerAgent and others) | Admin Console, Agents |
| Logging application, System Properties | Admin Console (logs, caches, agents, read-only SQL) | /html/en/default/admin |
| Migration Manager packages | Object Migration packages | Object Migration |
| Security groups | Security groups | Security Manager |
1. Everything is published piece by piece. There is no single "apply configuration" moment: the object, the form, each query, each workflow and each menu item is published on its own, and each keeps its own revisions.
2. Links are data, not SQL. A Maximo relationship is a where clause you write once. An MREF association is created record by record (a user picks spaces with Find, or a workflow associates records), so related lists only show what was actually linked.
3. Save is an action. Save, Activate and Retire are state-transition actions with names (triSave and so on),
and workflows listen to those names. Think of an automation script launch point on save, but configured instead of coded.
4. Lists are reports. Where Maximo has a List tab with a where clause, MREF has a query designed in the Report Manager, with its own columns, filters and actions. Even the Add button is an action on the query.
5. Naming conventions matter more. Field names carry their type (TX text, NU number,
CL classification) and are global across the system. IBM's objects start with tri; yours should start
with your own prefix (we use cst), just as you prefix custom Maximo attributes.
Getting startedWhere the builder tools are
Sign in as an administrator. The home page of the Application Administrator has an Application Builder panel with
all the tools used in this guide: Data Modeler, Form Builder, Association Manager, Workflow Builder, Navigation Builder and
Report Manager. The Admin Console (agents, caches, logs) is a separate page at /html/en/default/admin/index.jsp.
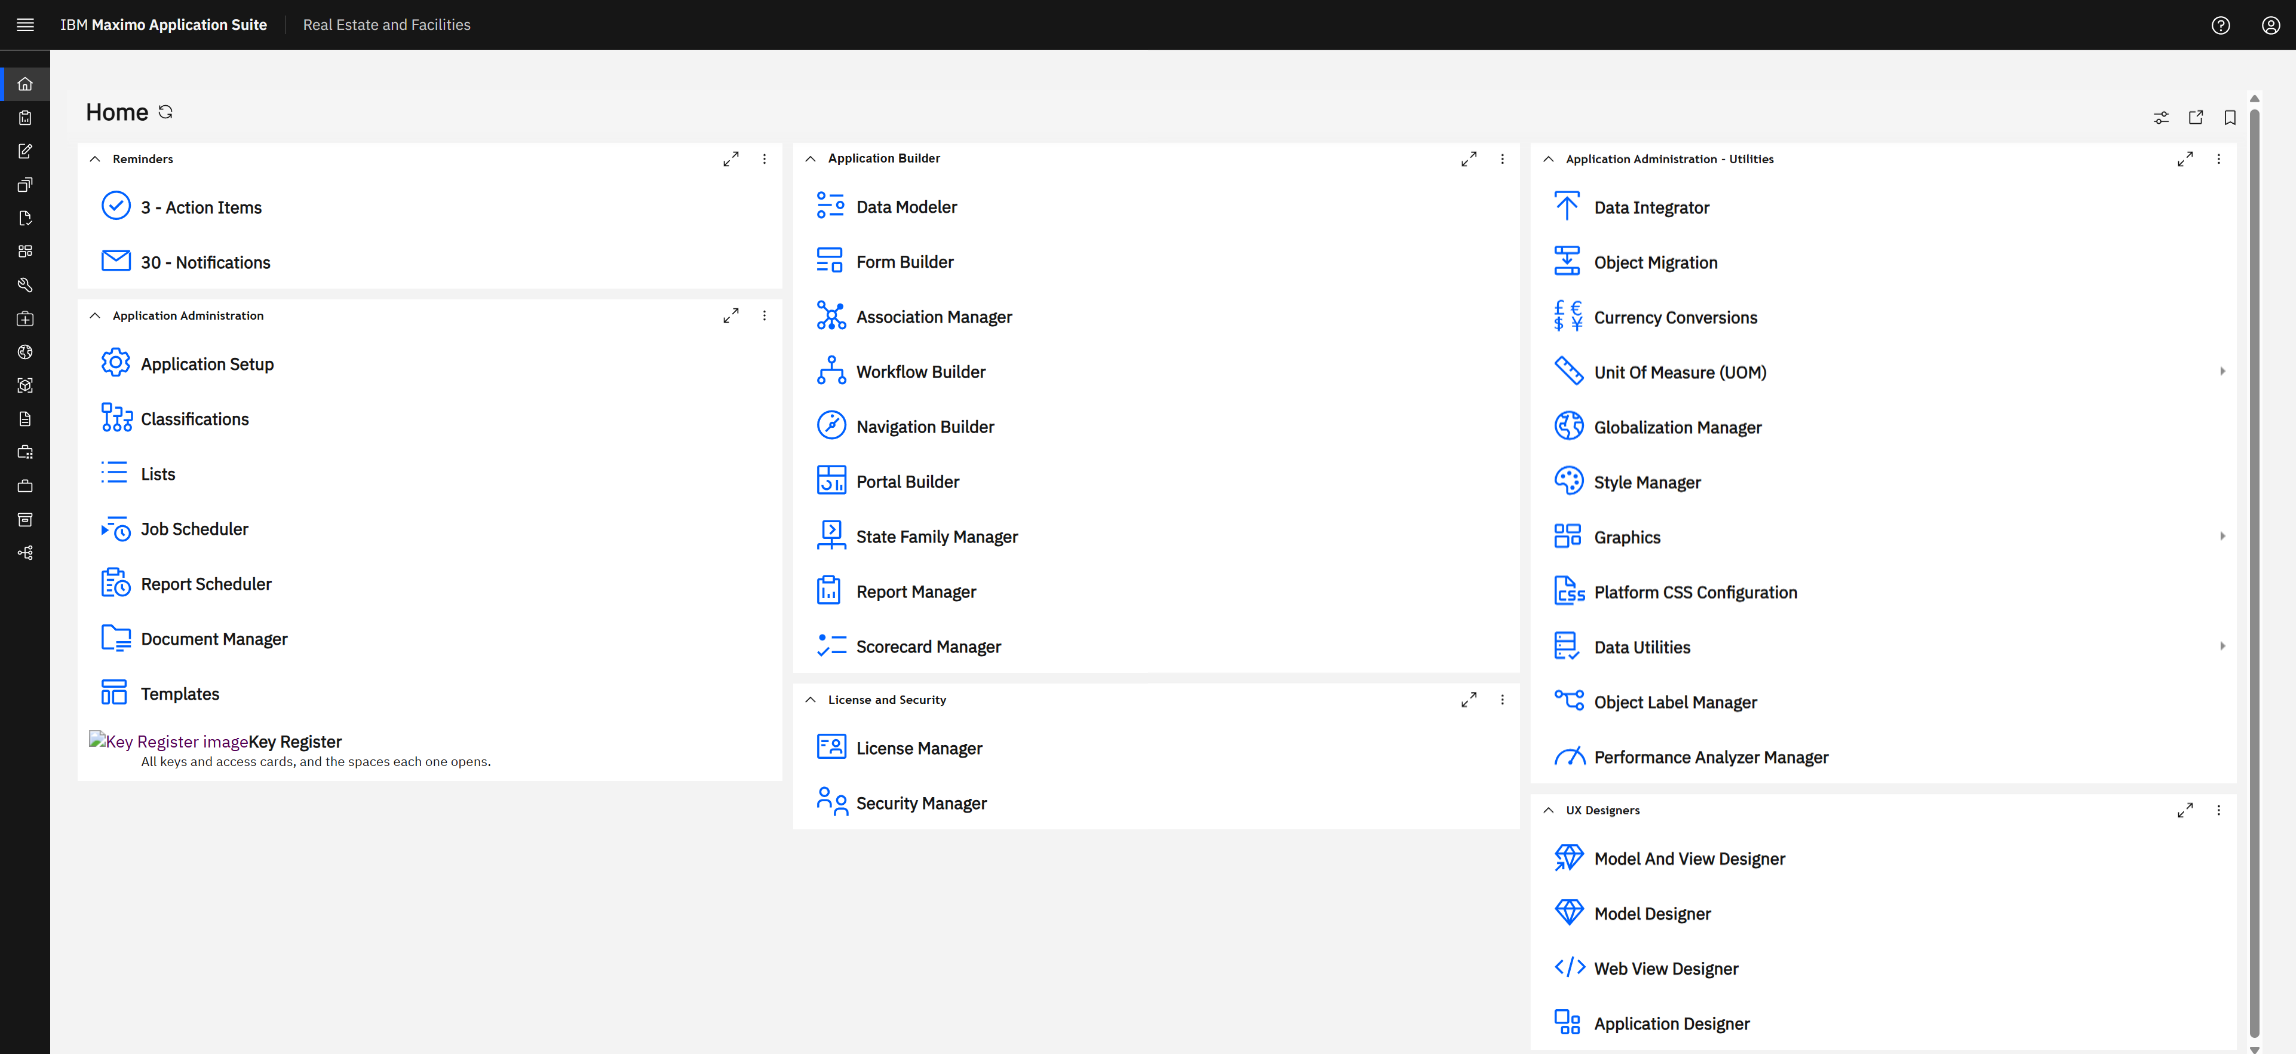
The builders are the classic TRIRIGA tools: they open in frames and pop-up windows, and they ask questions with browser alert boxes. That is normal. The last part of this guide shows how we made that easier to work with.
Step 1 · Data ModelerThe business object
The business object (BO) is the record type. It lives in a module, a family of related objects that share fields, associations and behaviour.
This is Database Configuration: a new object with its attributes. A module is a bit like objects that share a base table and its columns (think of TICKET shared by SR and INCIDENT). "Publish BO" plays the role of Apply Configuration Changes, without admin mode.
The first attempt, and why we threw it away
Our first idea was to keep everything tidy in a new module, cstKeys. Creating it was easy:
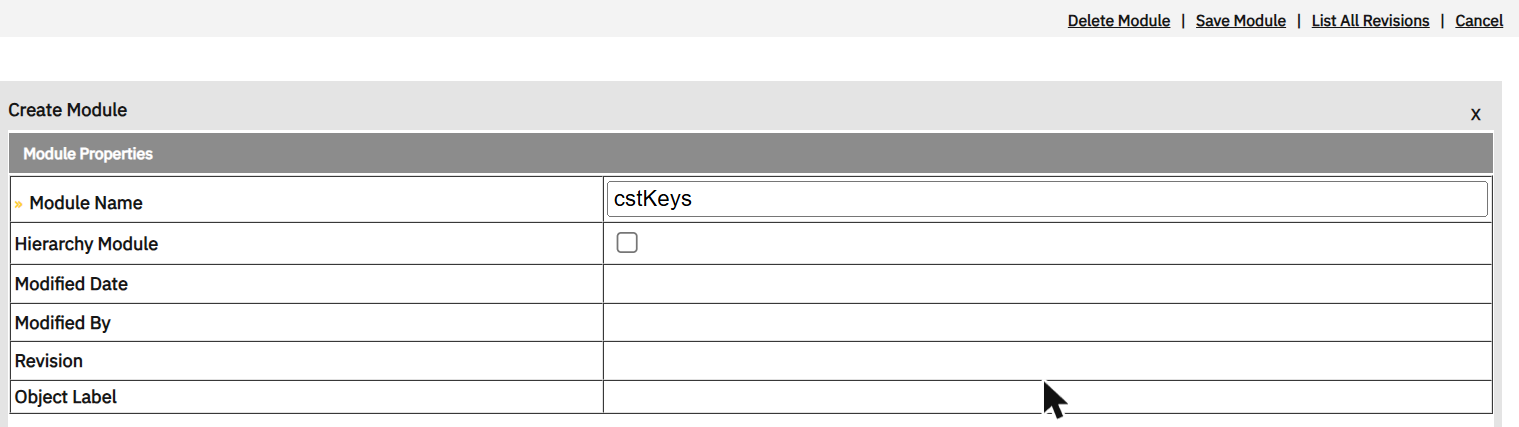
The object, form, query and menu item all built and published without a complaint. Then the first Add on the new
page failed with a generic error, and the server log showed a database error: SQLCODE -150 on a table that did not exist.
This MREF system runs with Module Level Associations switched on (you can see it on the Admin Console summary:
"Enabled (converted to Module Level Associations)"). In that mode every module keeps its links in its own table, named
MA_<MODULE>. A brand-new module did not get one, so the platform could not save the new record's links.
Rule: create new business objects in an existing module that fits (here triKeyManagement, which has
MA_TRIKEYMANAGEMENT). You also get the module's standard fields, associations and lifecycle for free.
Create the object in triKeyManagement
In the Data Modeler tree, open triKeyManagement, then New → Business Object.
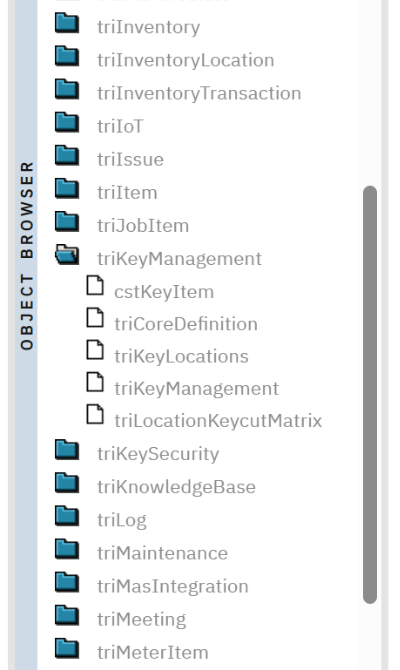
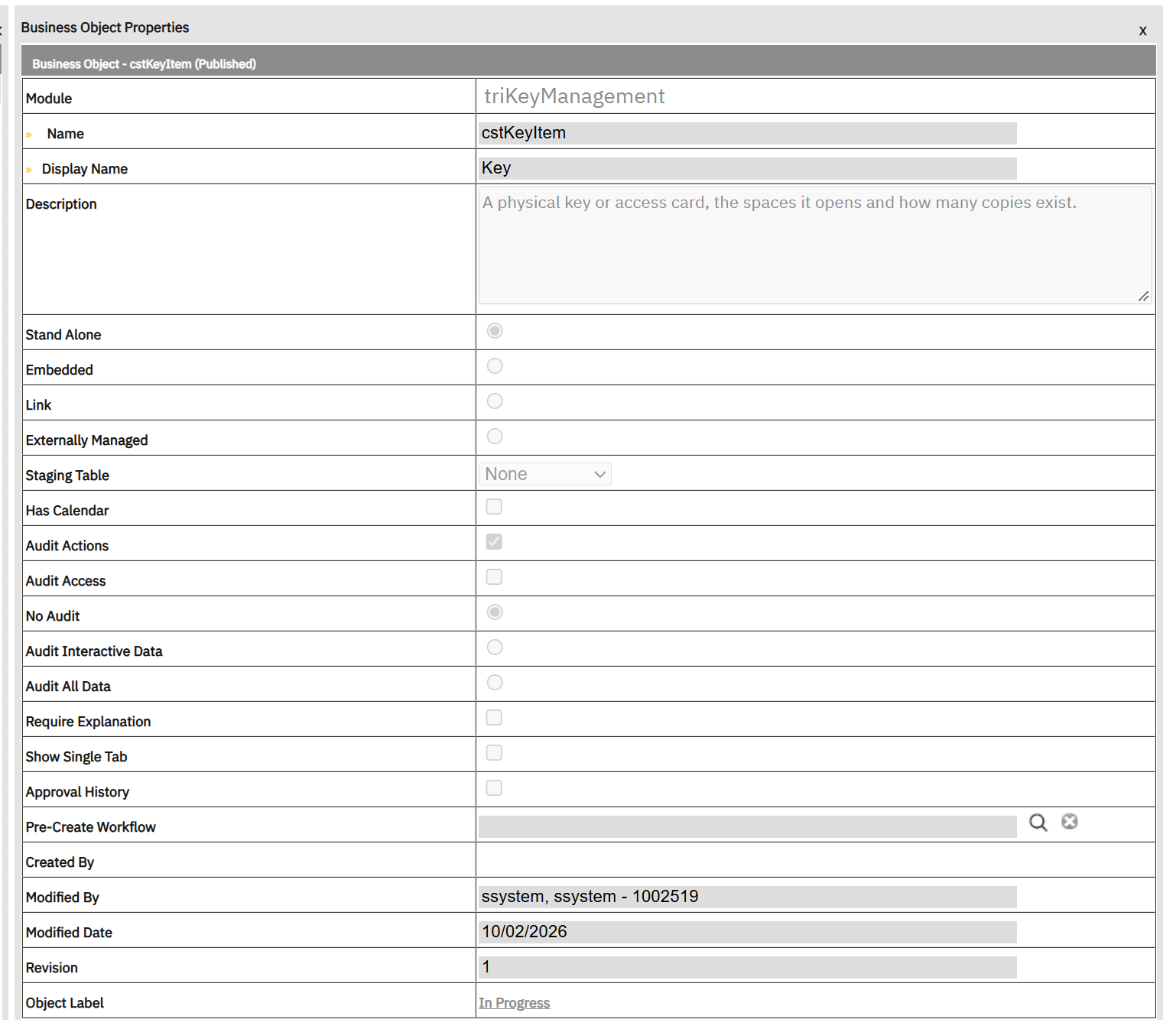
cstKeyItem, display name "Key", Stand Alone.Because it lives in triKeyManagement, the new object already has the module's fields: name, ID, status, description, organization, location and more. You only add what is specific to keys.
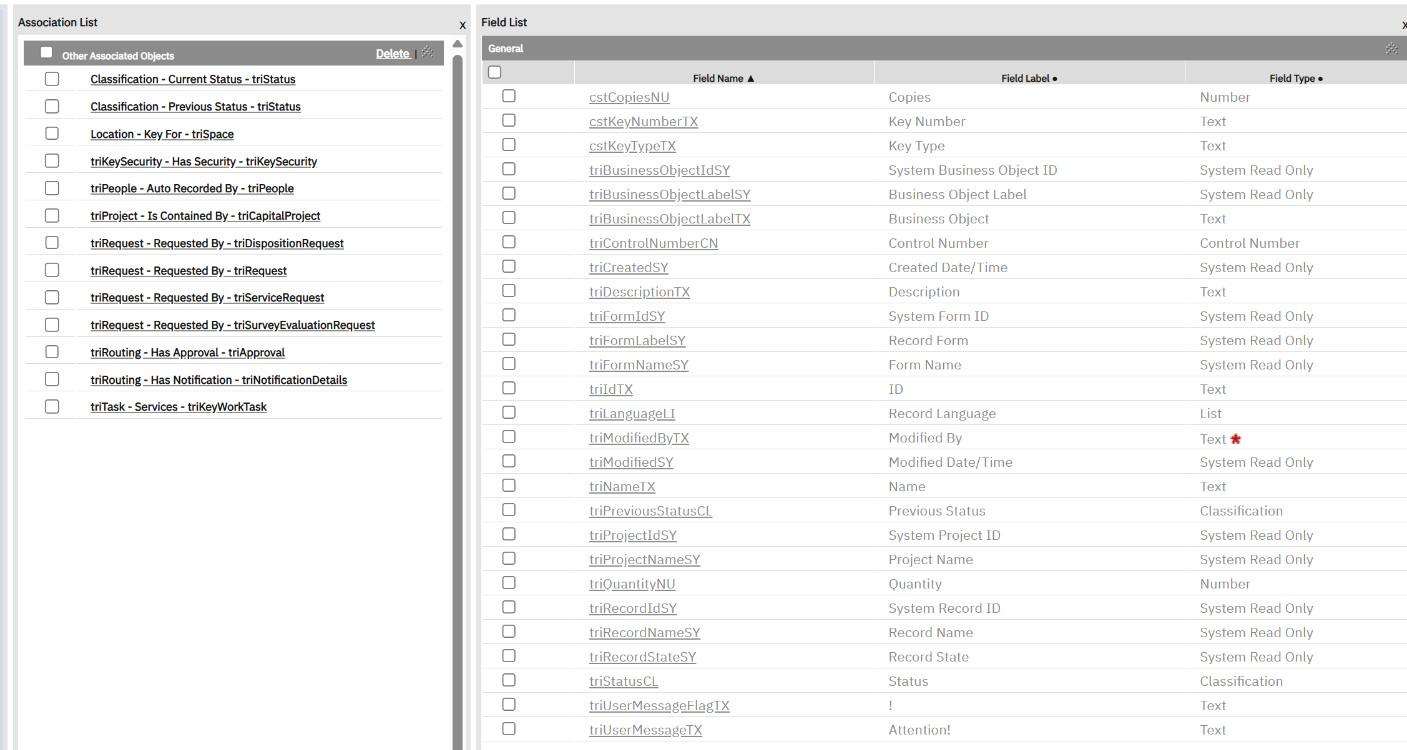
Add the fields
Three fields, all in the General section:
| Name | Label | Type | Notes |
|---|---|---|---|
cstKeyNumberTX | Key Number | Text | Required, size 50 |
cstKeyTypeTX | Key Type | Text | Master, Sub-master, Room… |
cstCopiesNU | Copies | Number | How many copies exist |
The suffix tells everyone the type (TX text, NU number, CL classification, DA date…). That is IBM's convention; keep it.
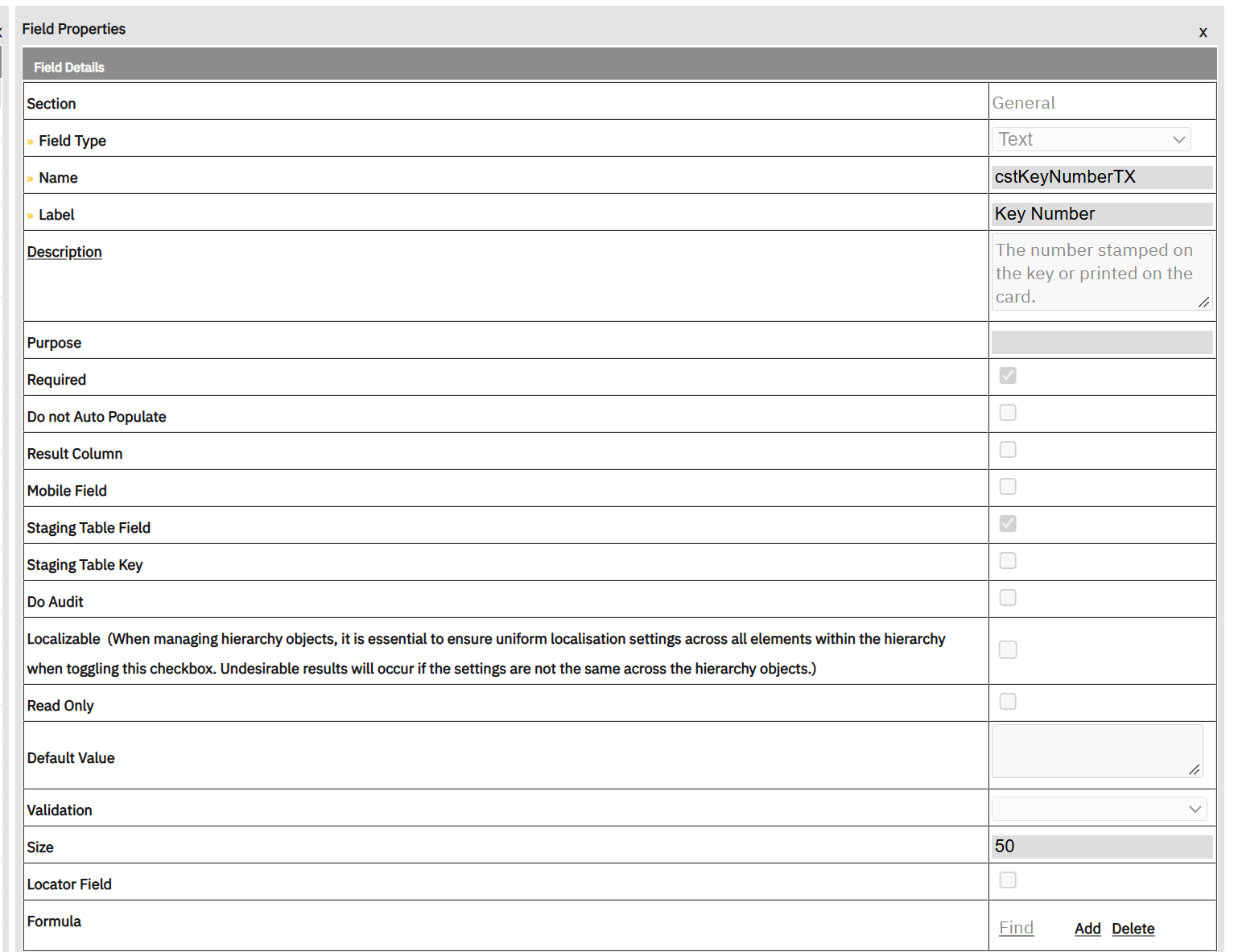
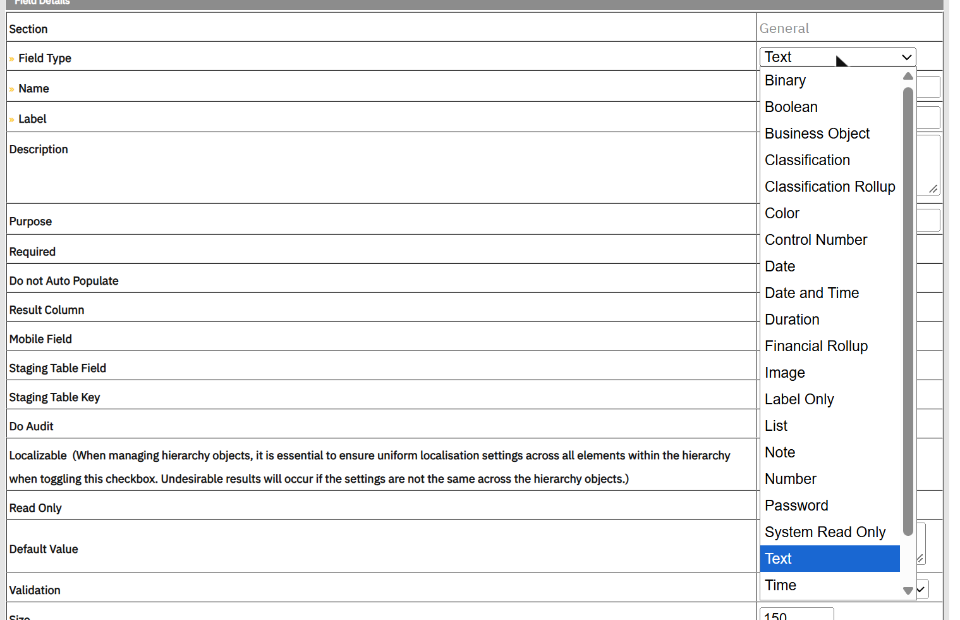
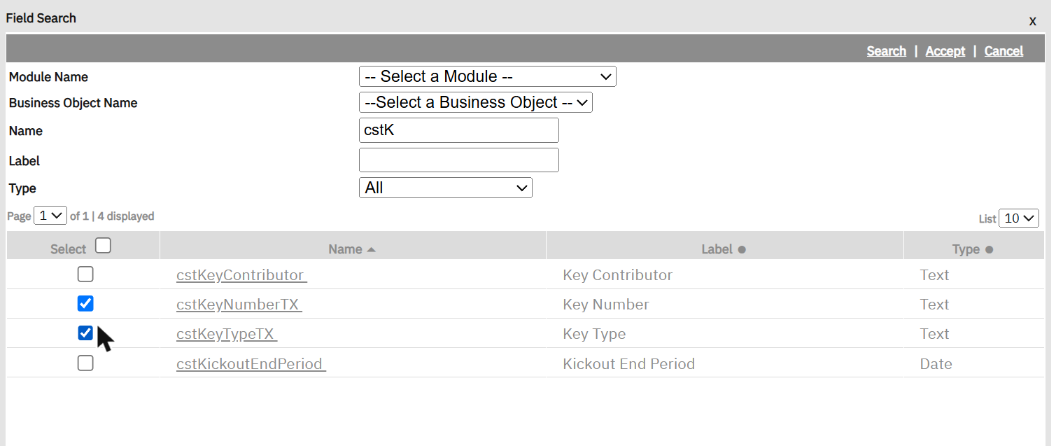
Field names are global in MREF: once cstKeyNumberTX exists on any object, you cannot create it again.
We hit this when rebuilding the object in the right module. The fix is not a new name: use Find in the Field List,
search for the name, tick it and Accept. The existing field definition is added to your object.

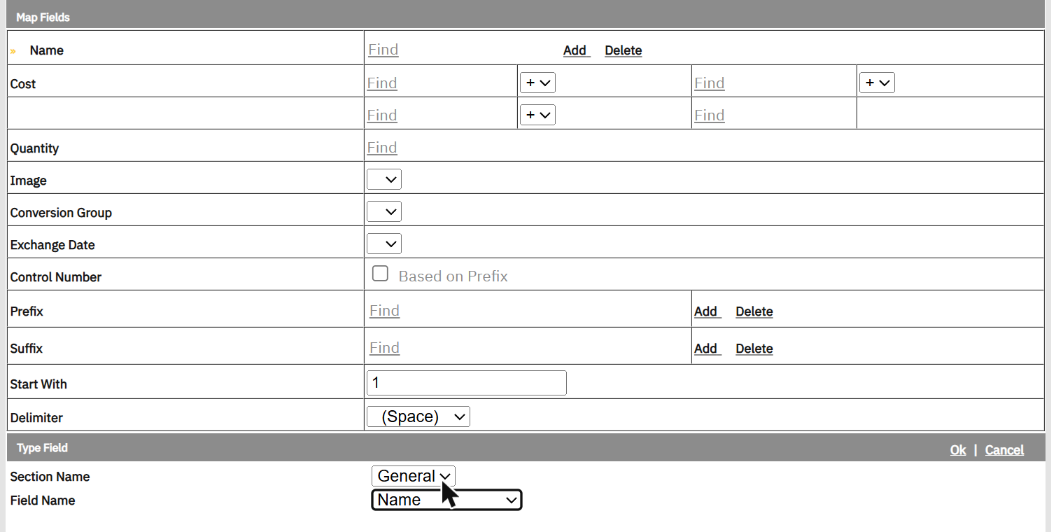
Name mapping and lifecycle
Mapping tells MREF which field is the record's name (what you see in headers, lookups and links). We map it to
triNameTX. The Name row accepts several fields joined by the Delimiter, so this is also where you would build a name such as
"Master MK-01" from two fields.
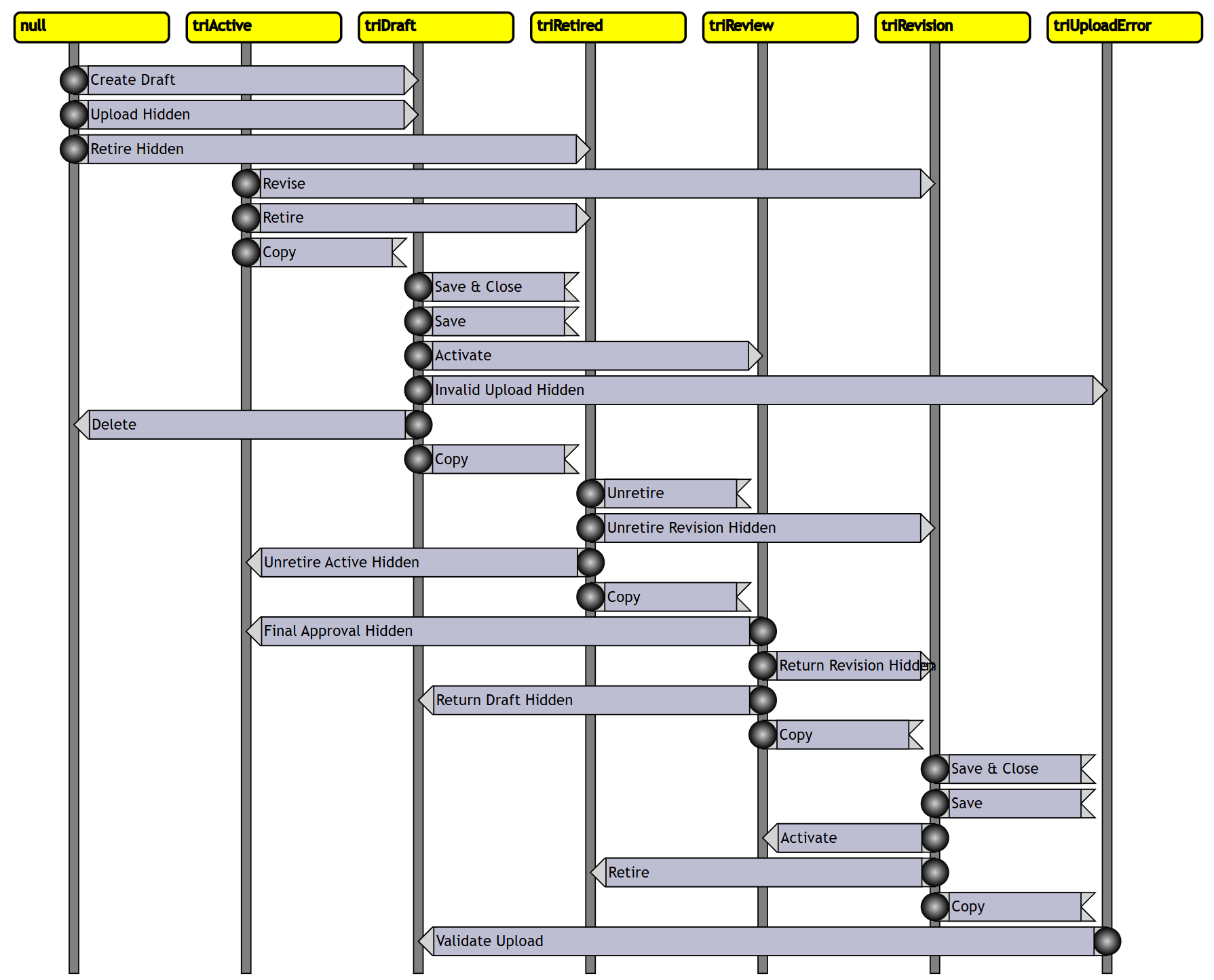
The state transitions (the lifecycle) come from the module: a key is created as Draft, can be activated, reviewed,
revised and retired. Each arrow is an action such as triSave or triActivate. Remember
triSave: the workflow in Step 5 listens to it.
Finally Publish BO. Publishing runs in the background (the ObjectPublishAgent) and you get a notification "Publication of cstKeyItem completed successfully". Wait for it before going on.
Step 2 · Association ManagerKeys and spaces
The nearest thing is a relationship in Database Configuration, but there is no where clause. The association only says "a key can be linked to a space, and that link is called Key For". Each actual link is stored when a user or a workflow connects two records.
An association is a named link between two objects, defined in both directions. A key is Key For a space; a space Has Key. Open the Association Manager, select your module and object, and Add:

Association names are shared across the system. "Key For" and "Has Key" already exist in MREF, so we picked them from the list instead of inventing new ones. That keeps reports and other tools consistent.
Step 3 · Form BuilderThe record screen
Form Builder is your Application Designer. Tabs and sections work the same way; a query section is the MREF version of a table window that shows related records.
Open the Form Builder, pick the module and click New.

Set the business object (cstKeyItem), a name and a label, and tick Default Form. MREF warns you, in an alert box, that changing an object's default form can affect workflows. For a new object that is fine.
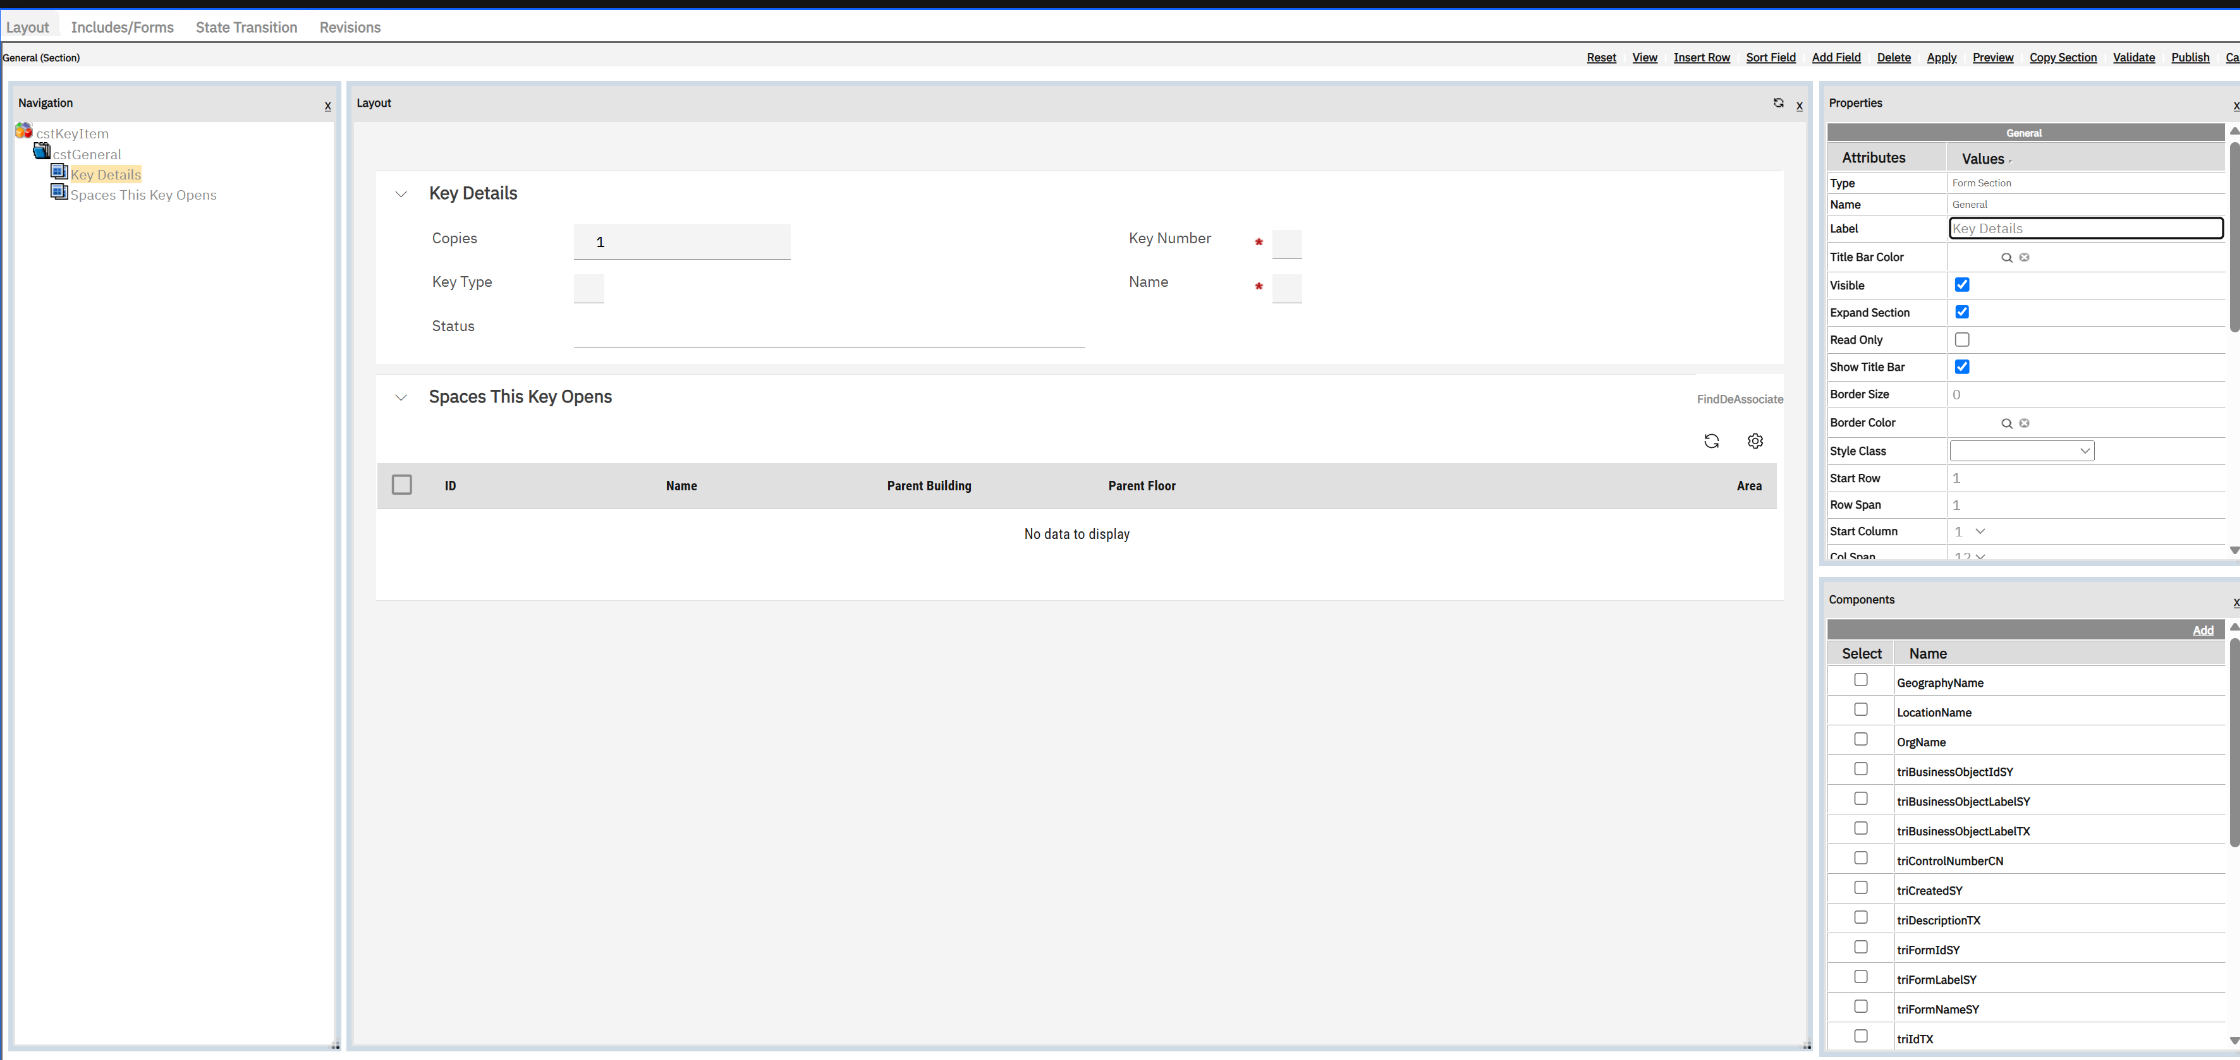
Then build the layout: a tab (cstGeneral), a section "Key Details", and the fields from the Components list.
The related-records section
To list the spaces a key opens, add a query section. A query section shows the results of a query from Step 4,
so you will come back here once the query exists. In the section properties pick the query, then set
Association Type to Key For. That tells the section which link to create when a user picks spaces.
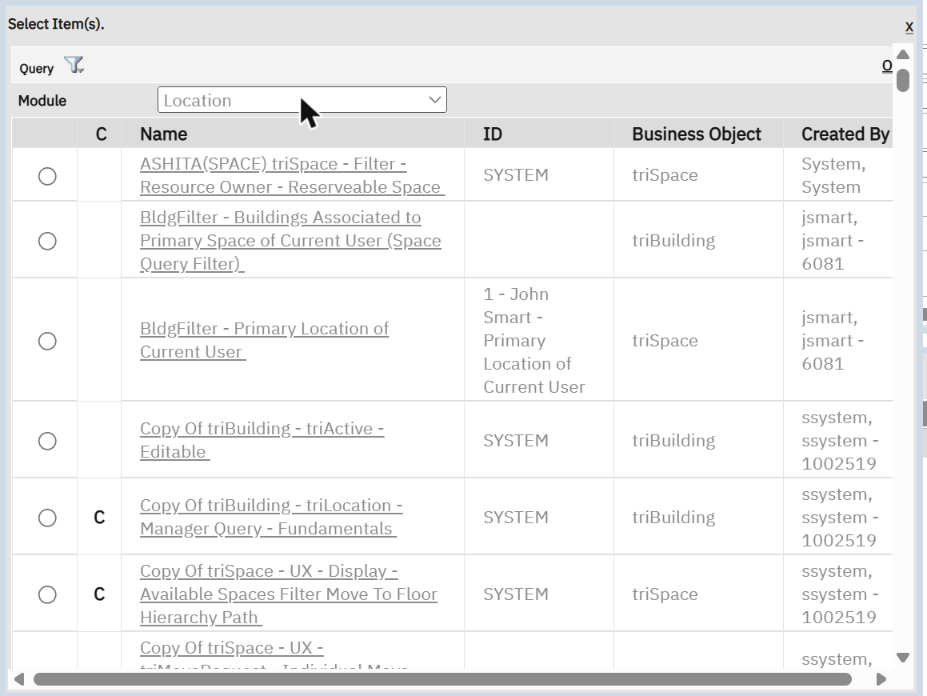
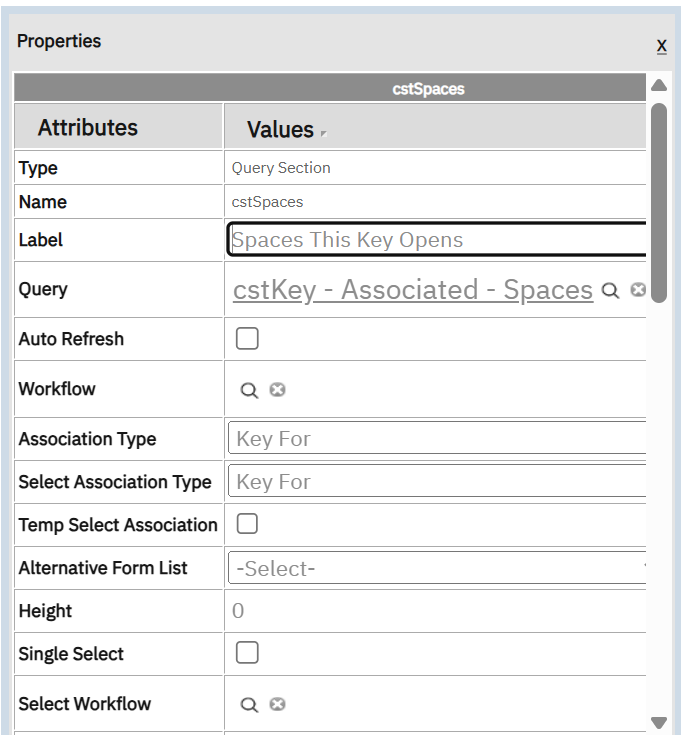
cstKeyItem - Associated - Spaces, association Key For. Find and DeAssociate actions are added for you.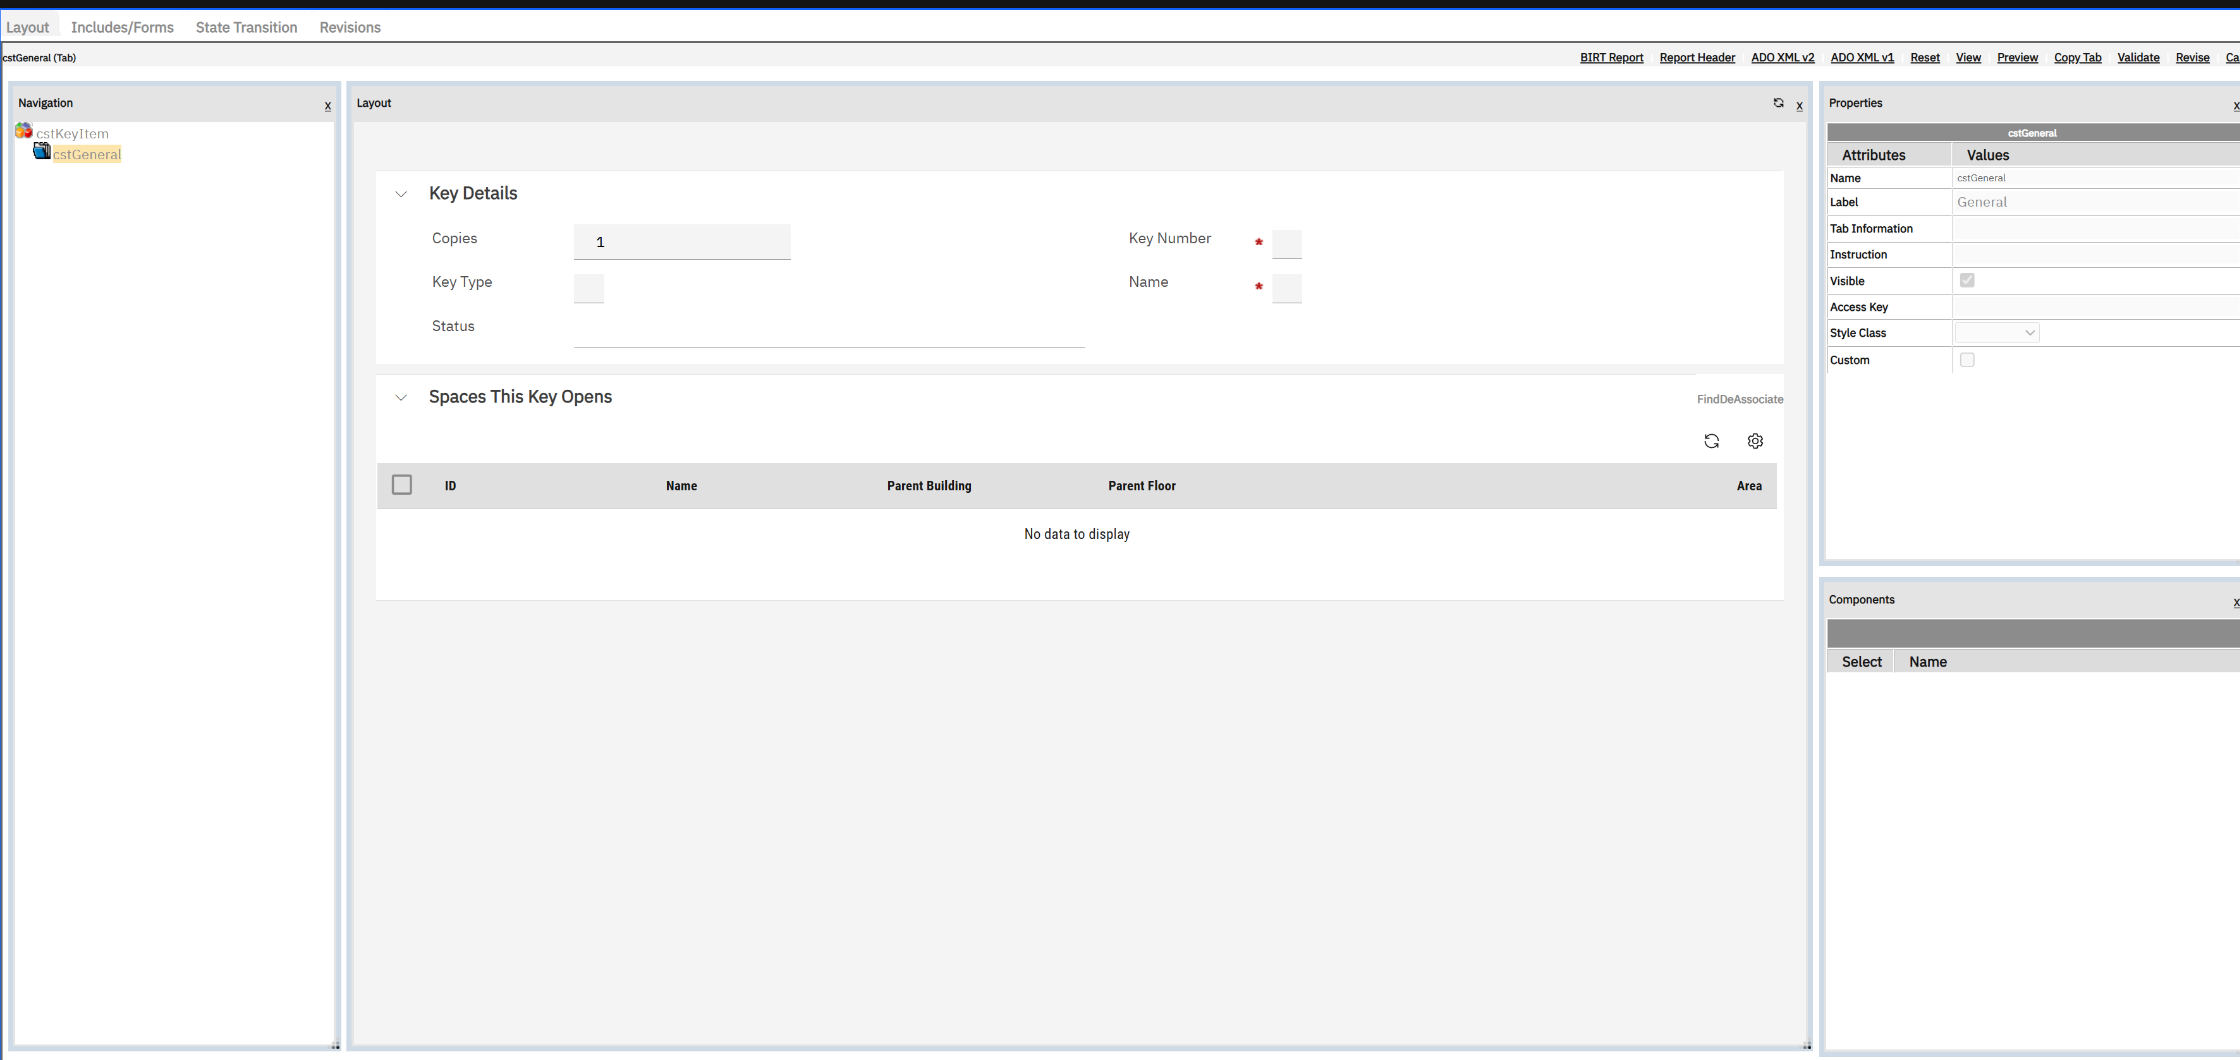
Step 4 · Report ManagerThe queries
This replaces the List tab and its where clause. The query defines the columns, the filters and even the actions (Add) of a list, and the same kind of query feeds the related-records section on the form.
In MREF, lists are queries. The Key Register list and the spaces section are both Query-type reports, made in the Report Manager (System Reports tab, so they are not tied to your user).

Query 1: the register list
General: name cstKeyItem - Manager - All Keys, title "Key Register", type Query, then Add Business Object:
module triKeyManagement, object cstKeyItem.
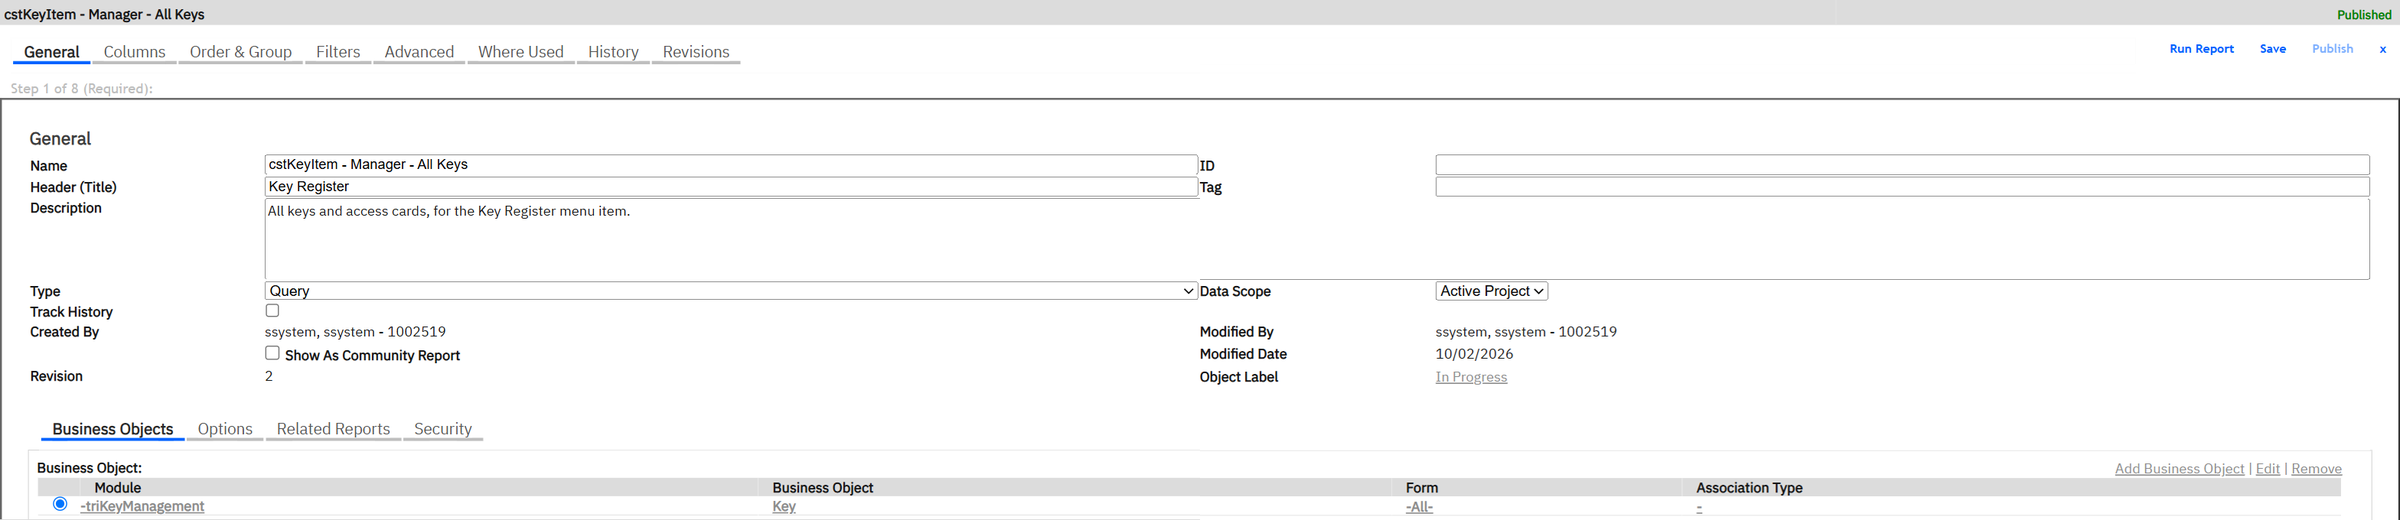
Columns: Name, Key Number, Key Type, Copies, Status.

Advanced → Actions: add a System Add action. Without it the list page has no Add link and nobody can create a key.

Query 2: the spaces of this key
Name cstKeyItem - Associated - Spaces, title "Spaces This Key Opens", object Location / triSpace, columns ID, Name,
Parent Building, Parent Floor, Area.
Our first version listed all 10,849 spaces on every key. The query had no idea which key was open. A query used in a query section needs an association filter on the record in context:
Advanced → Association Filters → Add: module triKeyManagement, object cstKeyItem,
association Has Key (seen from the space), filter type Record, record $$RECORDID$$.
$$RECORDID$$ means "the record currently open on the form". The record picker only offers real records, so type it.


Step 5 · Workflow BuilderAutomation
One MREF workflow can do what you would do in Maximo with an automation script on save (set a value), an escalation (background work) or a Workflow Designer process (approvals). Asynchronous workflows run on the workflow agent, a bit like a cron task picking up queued work.
Workflows are MREF's automation: "when this happens to this kind of record, do these tasks". Ours: when a key is saved,
copy its Key Number into the standard ID field (triIdTX), so the number shows wherever IDs are listed.

The Start task
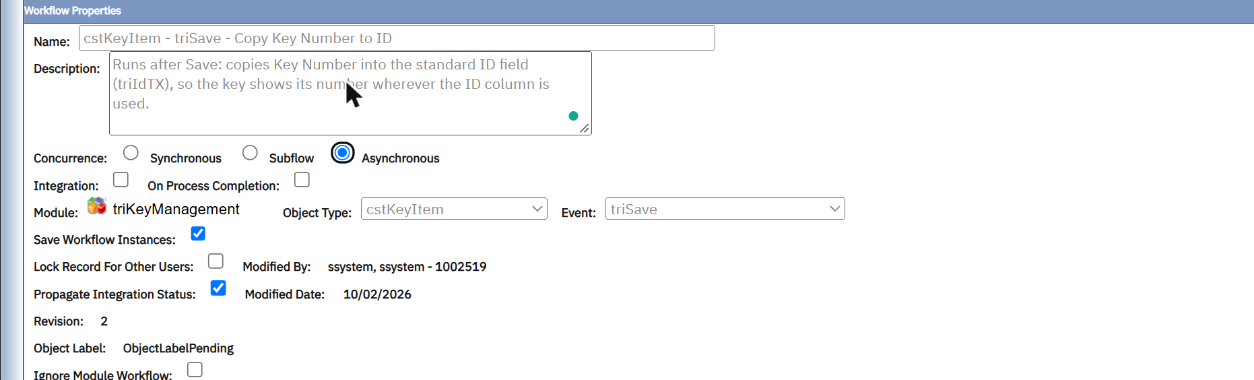
Click New. The designer opens with a Start and an End. Click Start to set the workflow properties:
- Name:
cstKeyItem - triSave - Copy Key Number to ID. The pattern "object - event - what it does" is IBM's own. - Concurrence: Asynchronous. Only then does the Event list offer the record actions; with Synchronous we only saw Pre-Create.
- Module triKeyManagement, Object Type cstKeyItem, Event triSave.
- Save Workflow Instances: ticked while you build and test.
Add a Modify Records task
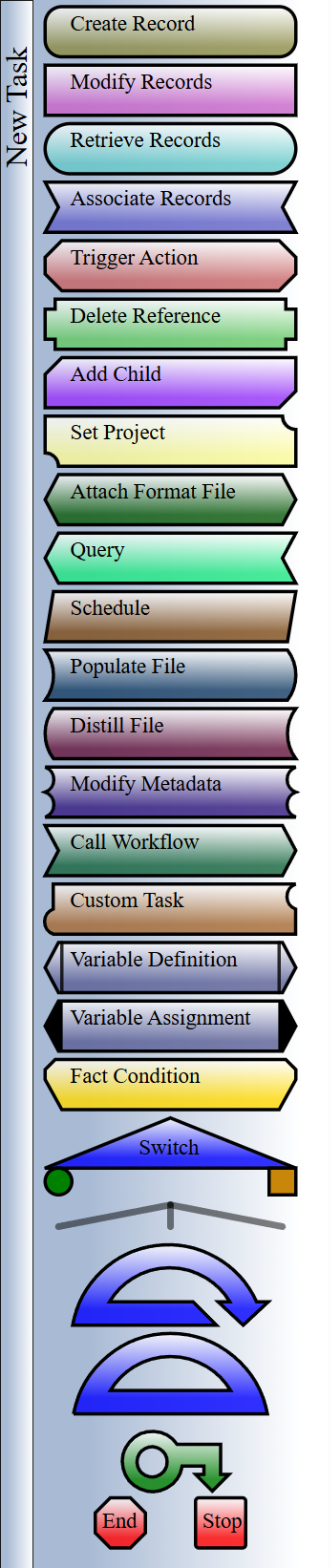
Hover over the New Task bar on the left: a palette opens. Click Modify Records, then click the arrow between Start and End to drop it there. Label it "Copy Key Number to ID".
In the task properties, Map To is the Start record (the key being saved). Click Edit Map. Every field starts mapped to
itself, which changes nothing. Change one row: on triIdTX click the magnifier (Attribute Picker) and choose
cstKeyNumberTX. The row now reads General::cstKeyNumberTX. Click OK.
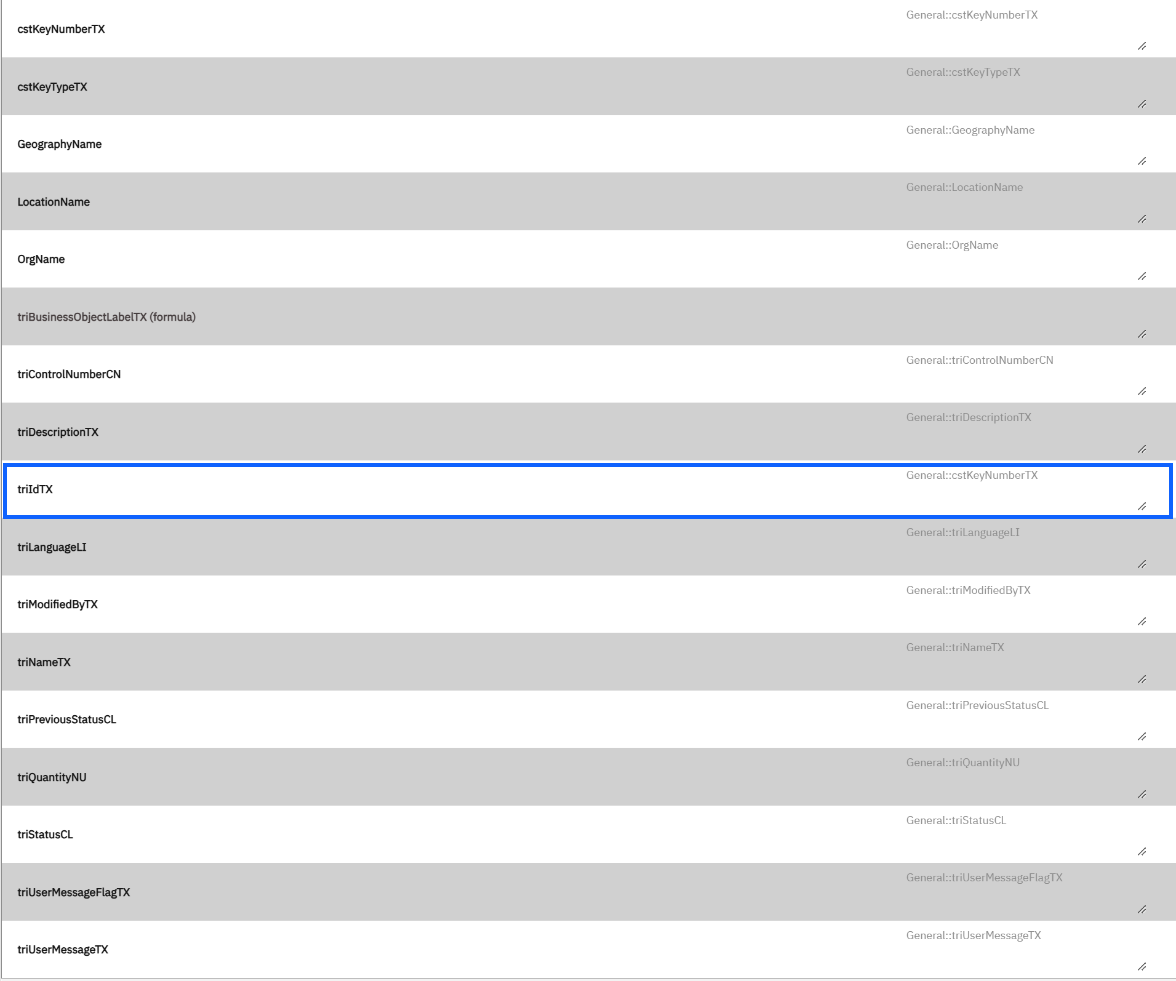
Our first workflow tried to set the Name to "Key Type + Key Number" by typing an expression into the triNameTX box. The boxes look editable but they are filled only by the icons next to them, and each row takes one source: picking a second field replaces the first. What we typed was never saved, so the workflow ran and changed nothing.
To combine fields into a name, use the BO's Name Mapping (Step 1) instead.
Click Publish on the Start task's properties bar.
Changing a published workflow
A published workflow cannot be edited. In the list, select it, click List All Revisions, then Revise. That creates a new revision "In Progress"; edit and publish it. The previous one is retired automatically.

When a workflow "does nothing"
This is the part nobody tells you. Our workflow was published, the key was saved, nothing changed and nothing failed. How we found out why, in order:
- Did Save change anything? Saving an unchanged record may not send the event. Change a field, then Save.
- Is the event reaching the agent? Asynchronous workflows are run by the WFAgent, often on a separate agents server. The Admin
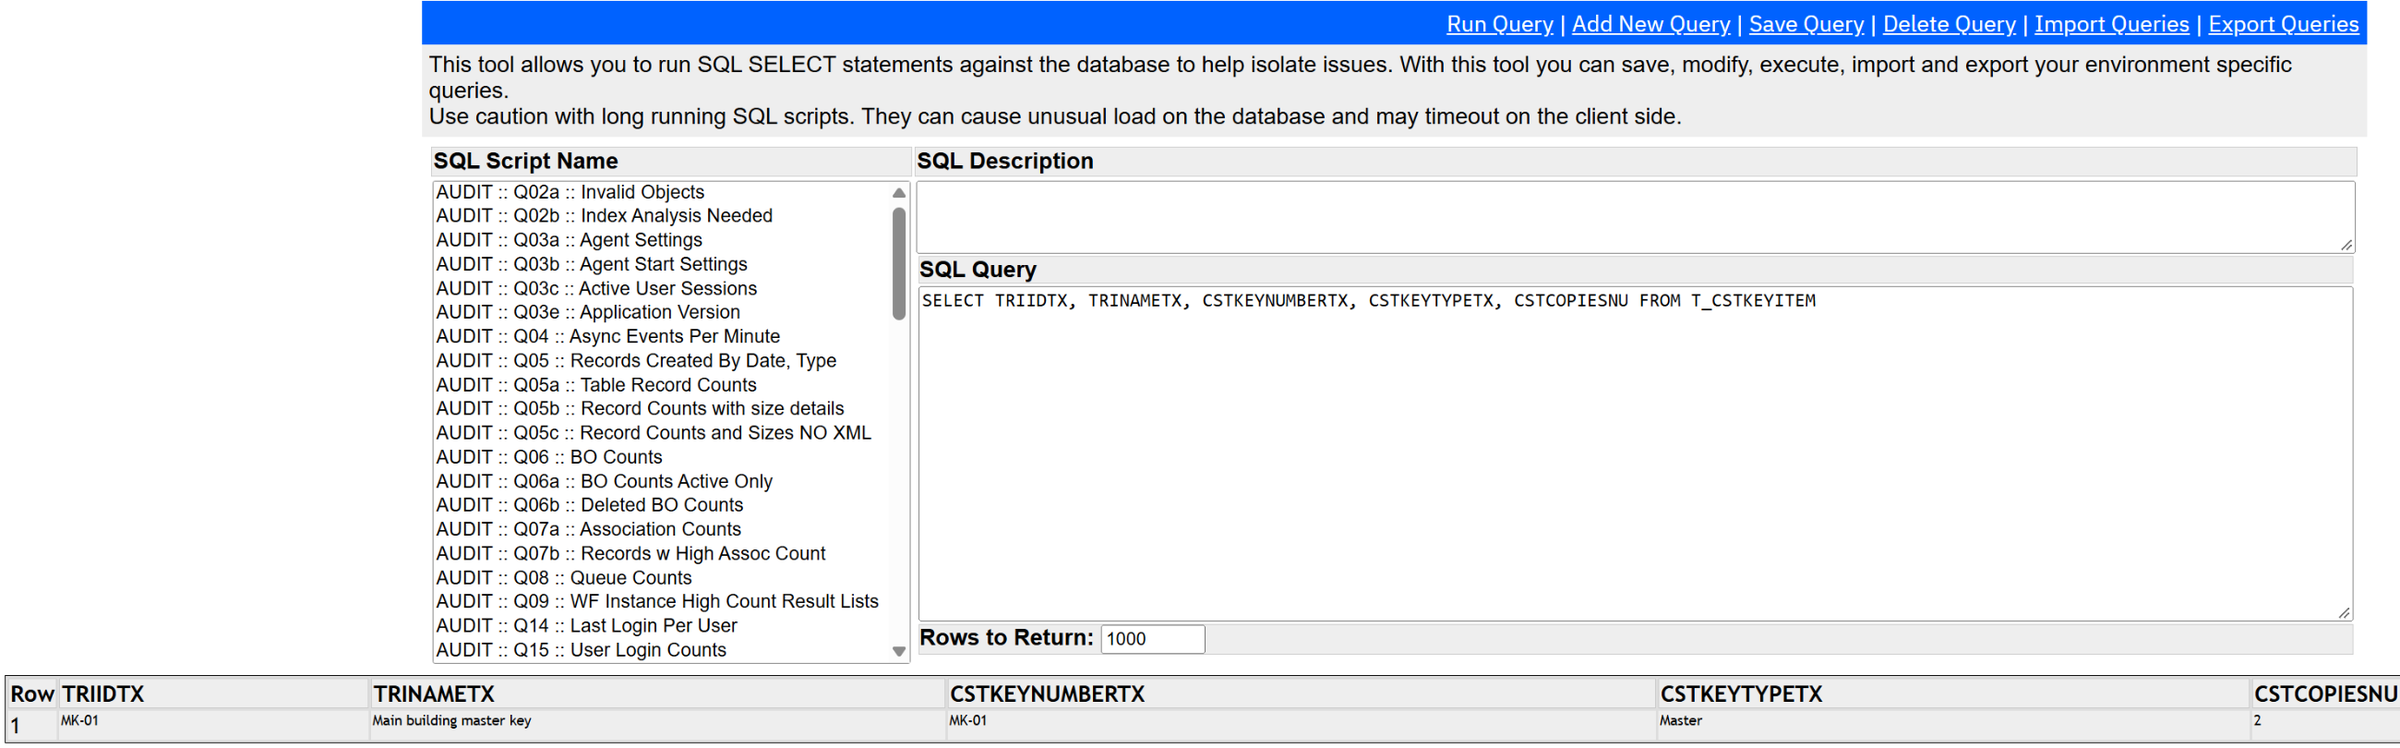
Console → Agents page shows where it runs. In the Database Query Tool,
WF_EVENT_HISTORYlists each event with its completion time. Our triSave events were there, completed in 4 seconds. - Is the agent using the new workflow? Admin Console → Caches → Workflows For Agent flushes the workflow templates the agents hold.
- Is there an instance? Workflow Builder → List All Instances. On our system instances are only kept for failed runs, so "no instance" plus "no change" pointed at the task itself, not the engine.
- Look at the map as saved, not as you remember it. Ours had every field mapped to itself.
After the fix, one Save was enough: the key's ID field held MK-01.
Step 6 · Navigation BuilderThe menu item
This is your Go To Applications menu and Start Center links in one tool. A navigation item points at a query and a form; a collection is a menu or a home-page panel that holds items.
Users reach apps through navigation items grouped in navigation collections (menus, home-page panels, quick links). Open the Navigation Builder.

Create the item in the Navigation Items Library:
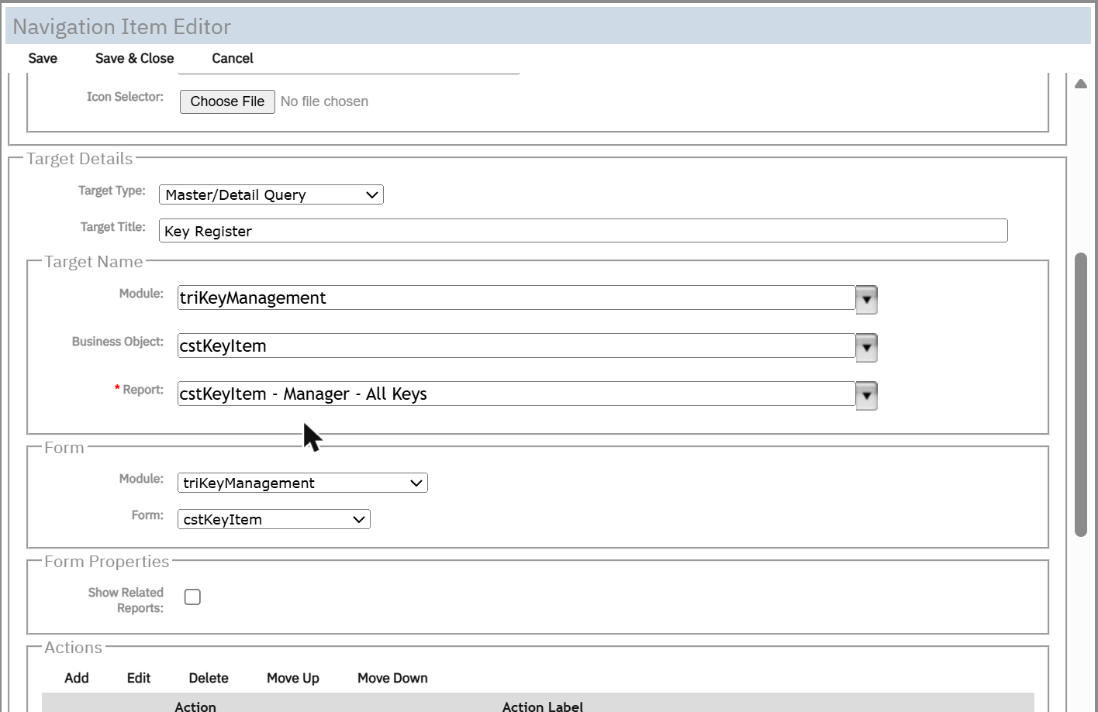
- Name
Master Detail - Key Register, label "Key Register". - Target Type: Master/Detail Query: a list on top, the selected record's form below. No extra pop-up window.
- Target: module triKeyManagement, object cstKeyItem, report
cstKeyItem - Manager - All Keys. - Form: triKeyManagement / cstKeyItem.
Then open the collection that feeds the administrator's home page
(triApplicationAdministrator - Quick Links - Home Application Administration), drag the item in, and Save.

Try itThe Key Register
Back on the home page, click Key Register. Click Add, fill in a key, Save. On the record, the spaces section is empty:
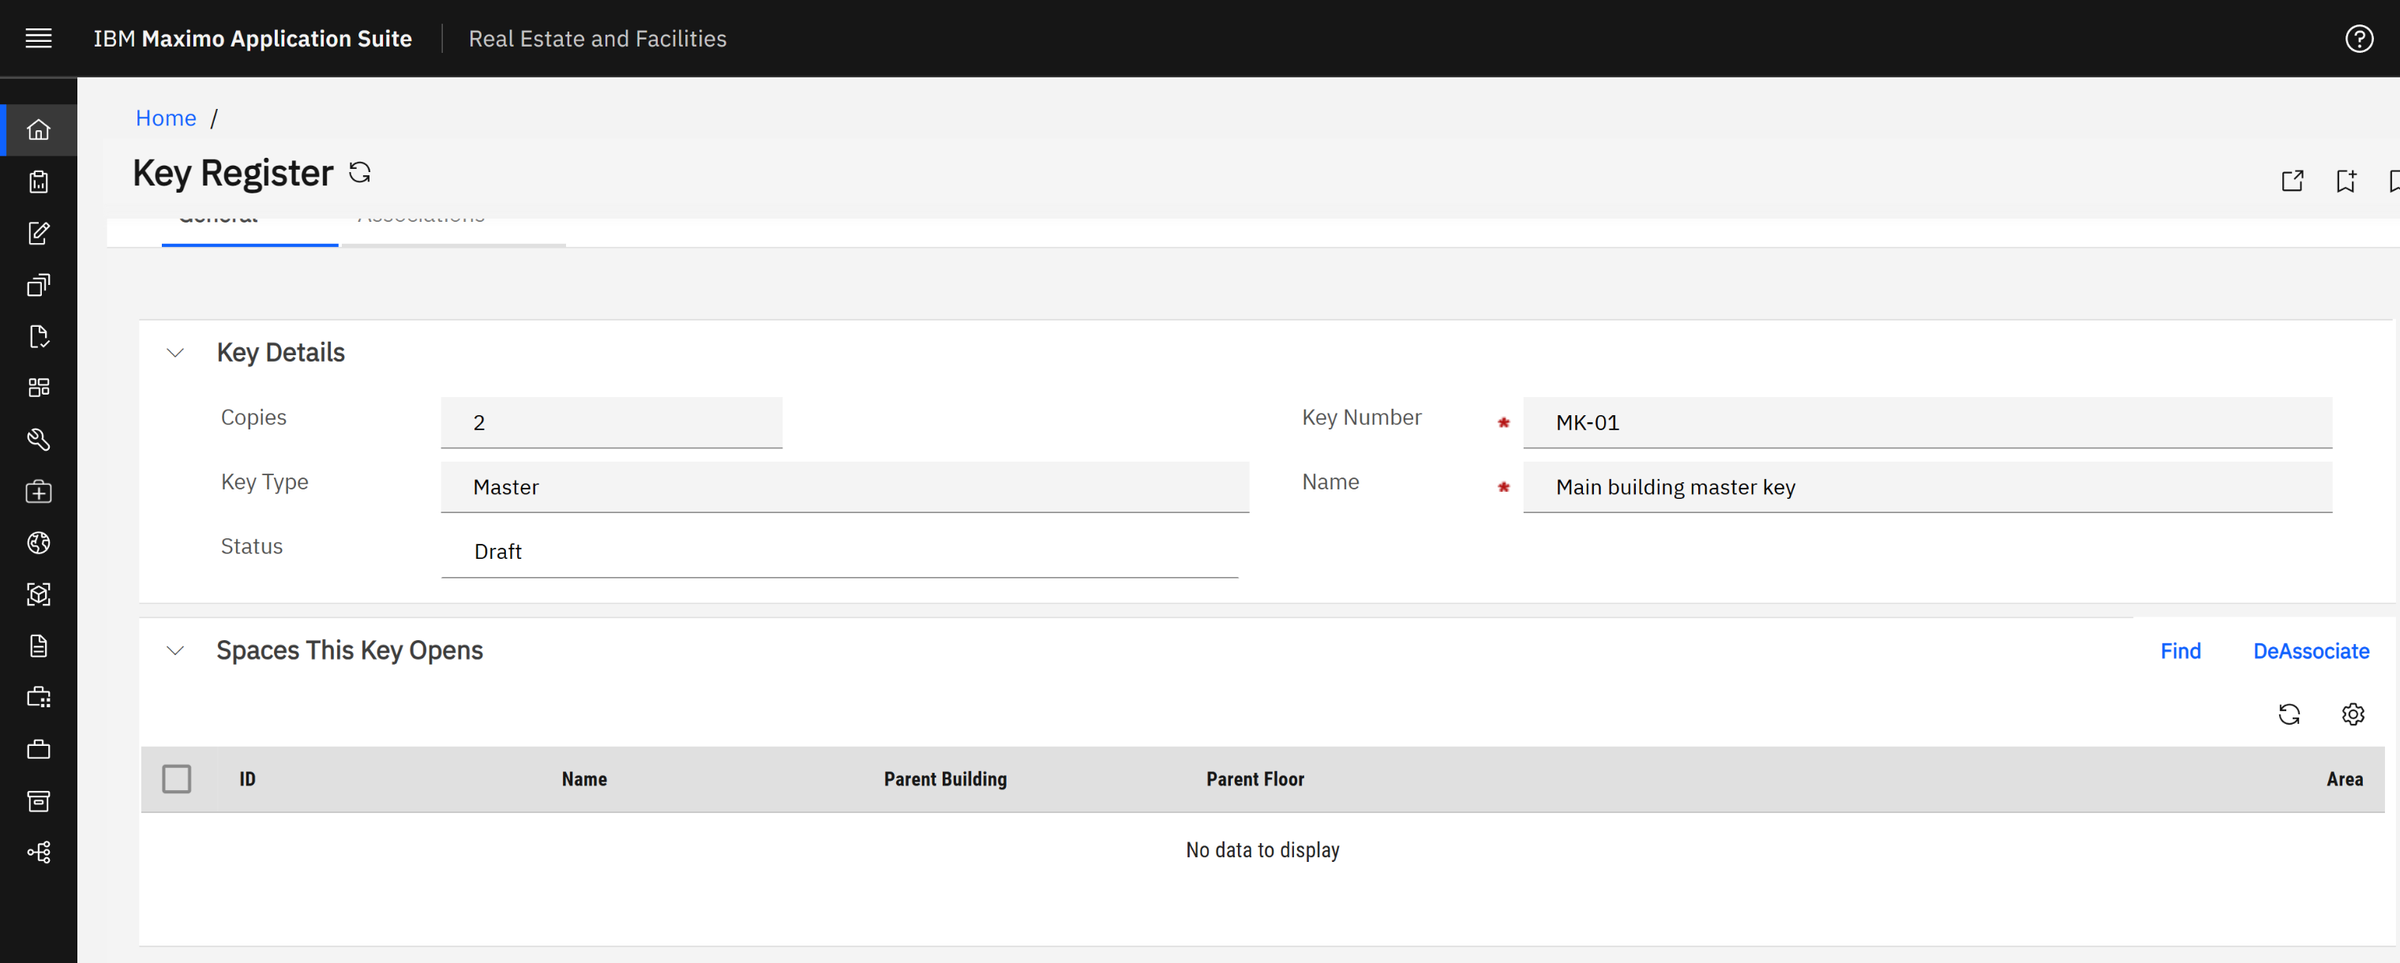
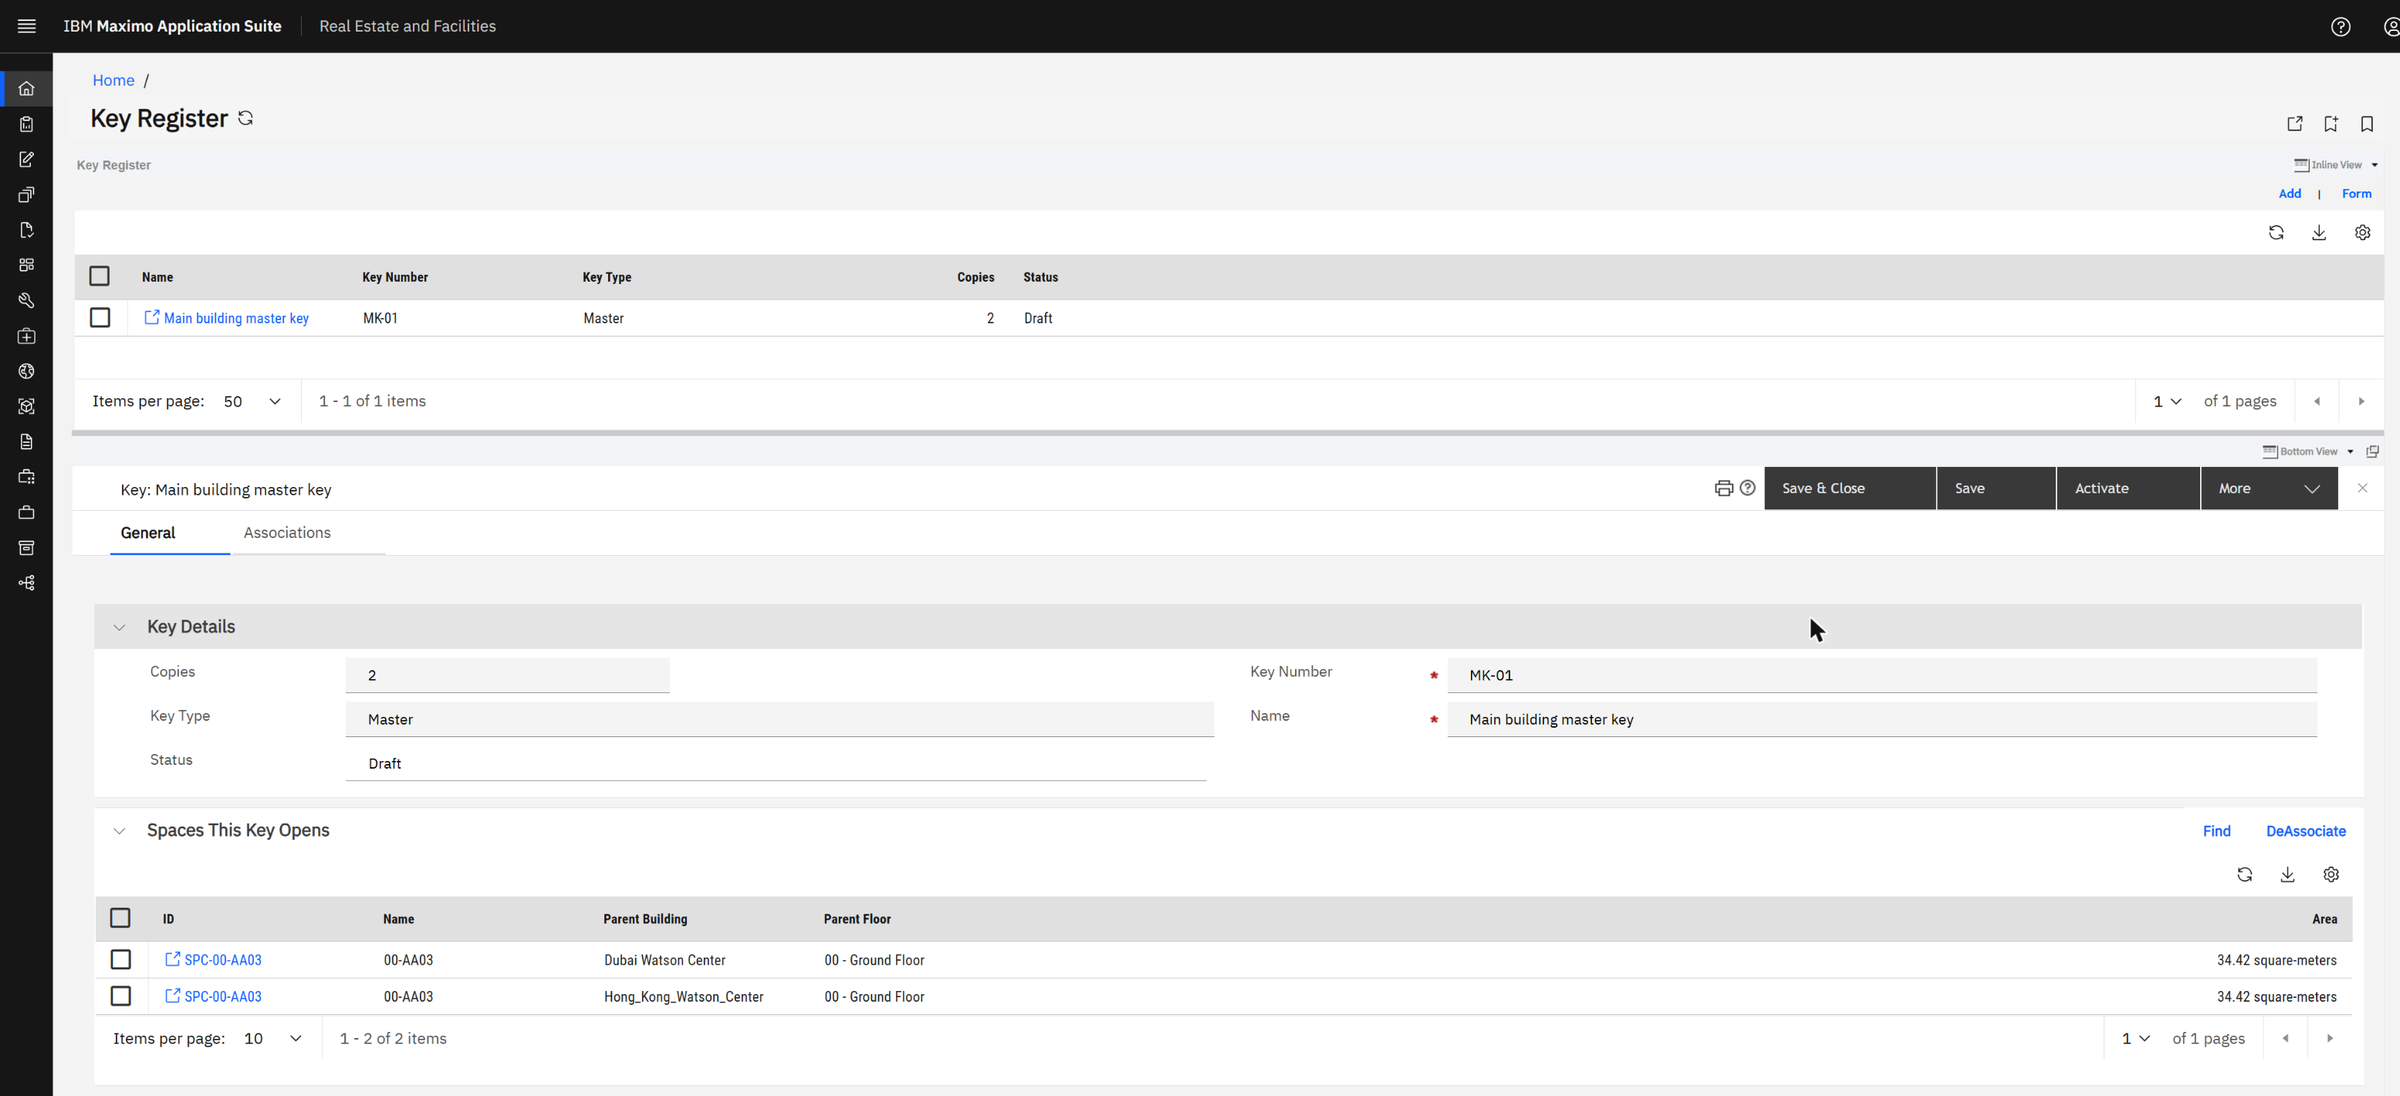
Top right of the list, Inline View / Popup View chooses whether a record opens below the list or in a window. Inline keeps everything on one page.
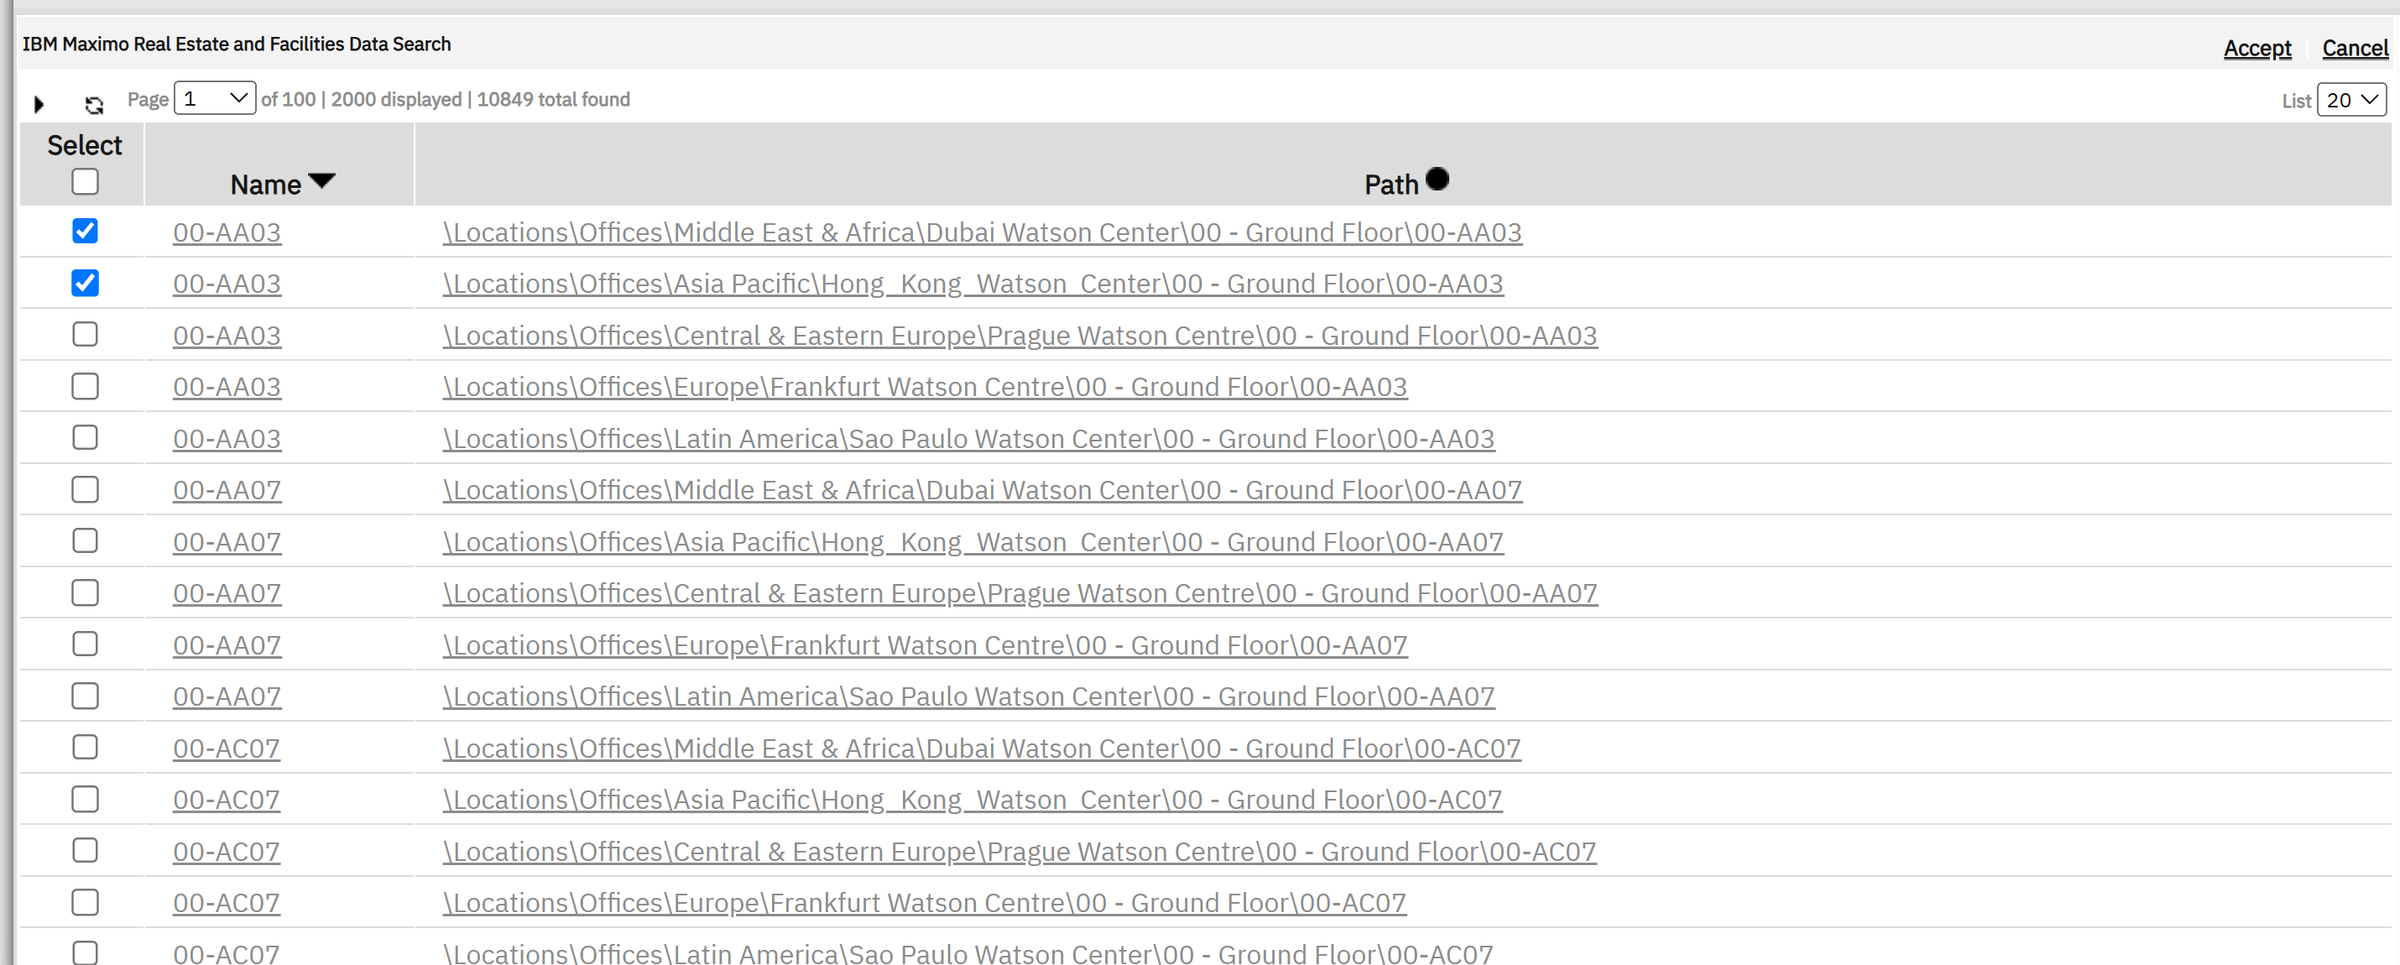
Click Find in the section, tick spaces, Accept:
Your toolboxThe Admin Console
Agents are your cron tasks, the Caches page gives you the refreshes you would otherwise look for in System Properties, and Error Logs is a small version of the Logging application. The Database Query Tool runs SELECT only.
When something does not work, the Admin Console (/html/en/default/admin/index.jsp) is the first stop.
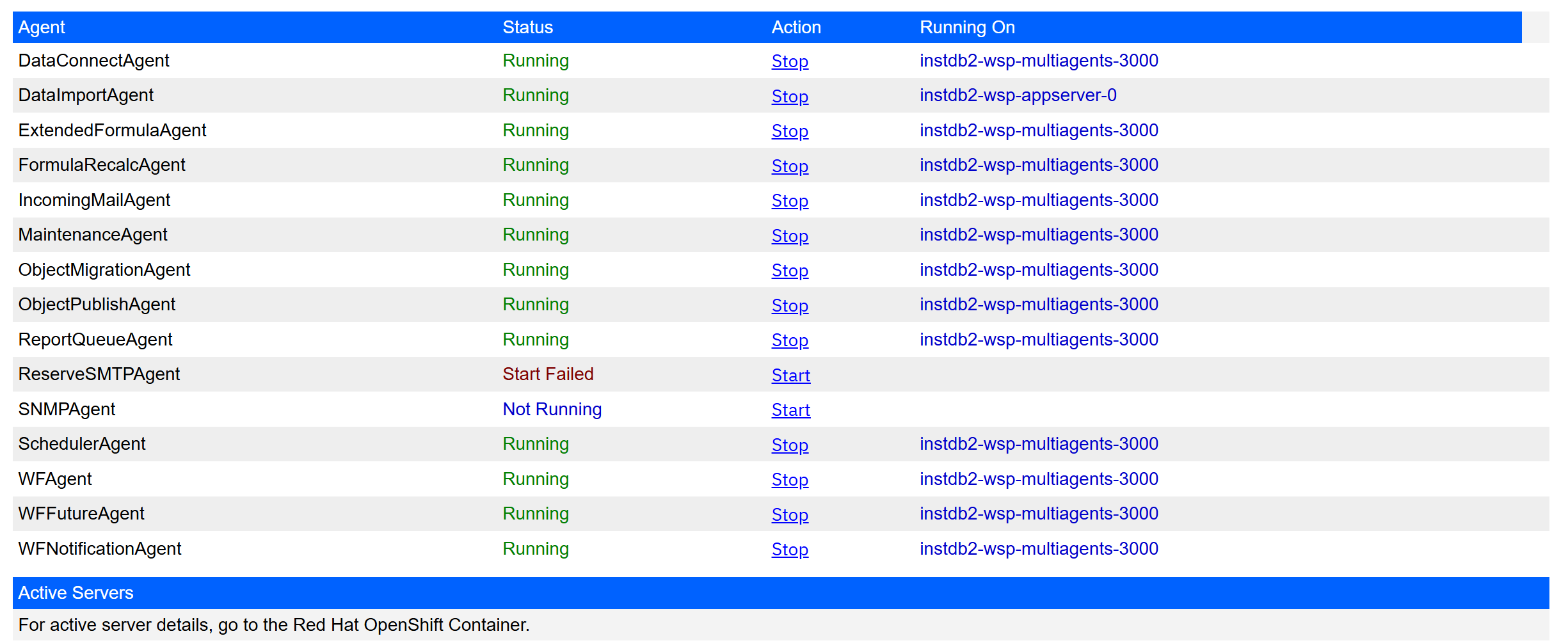
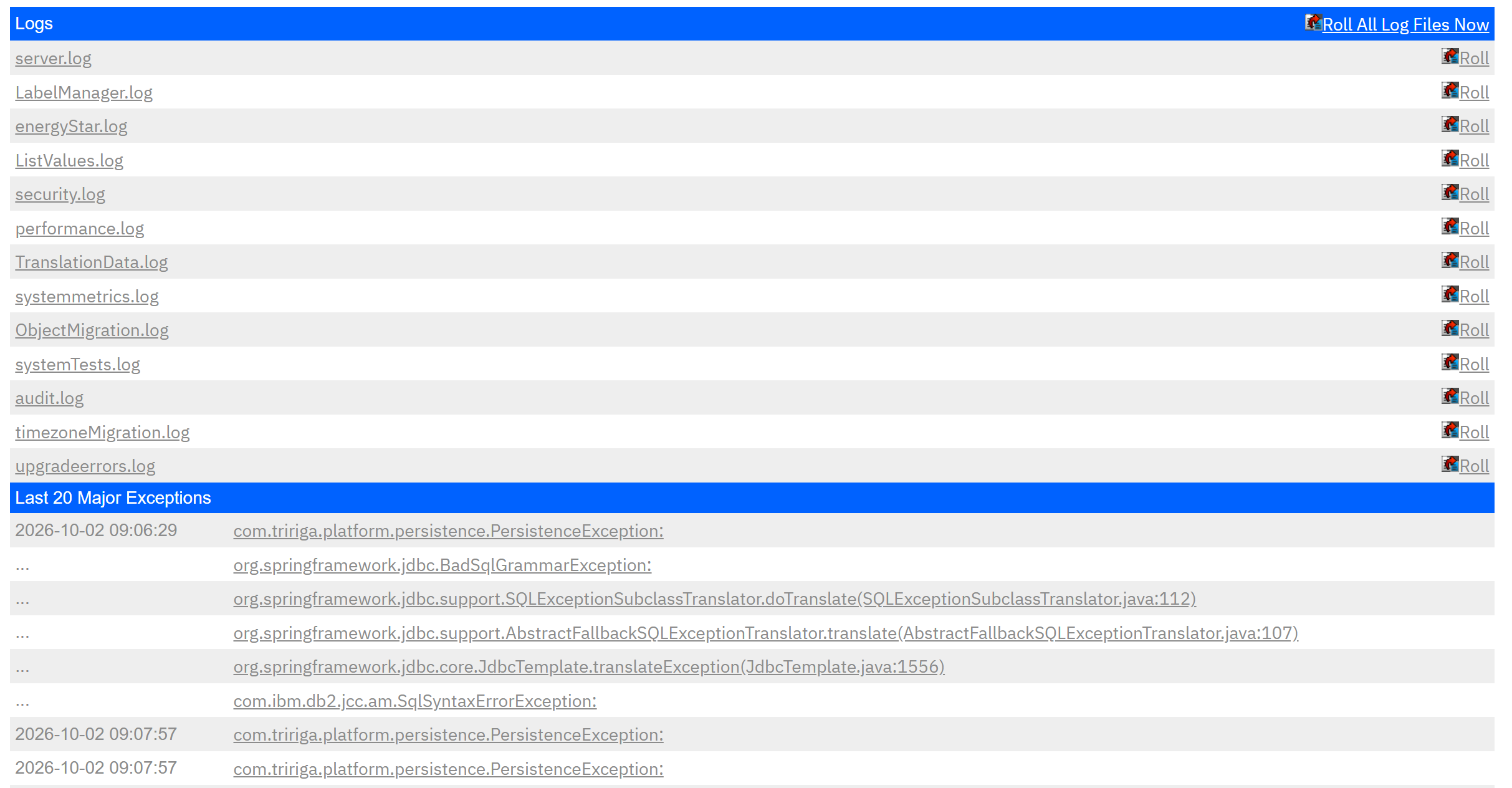
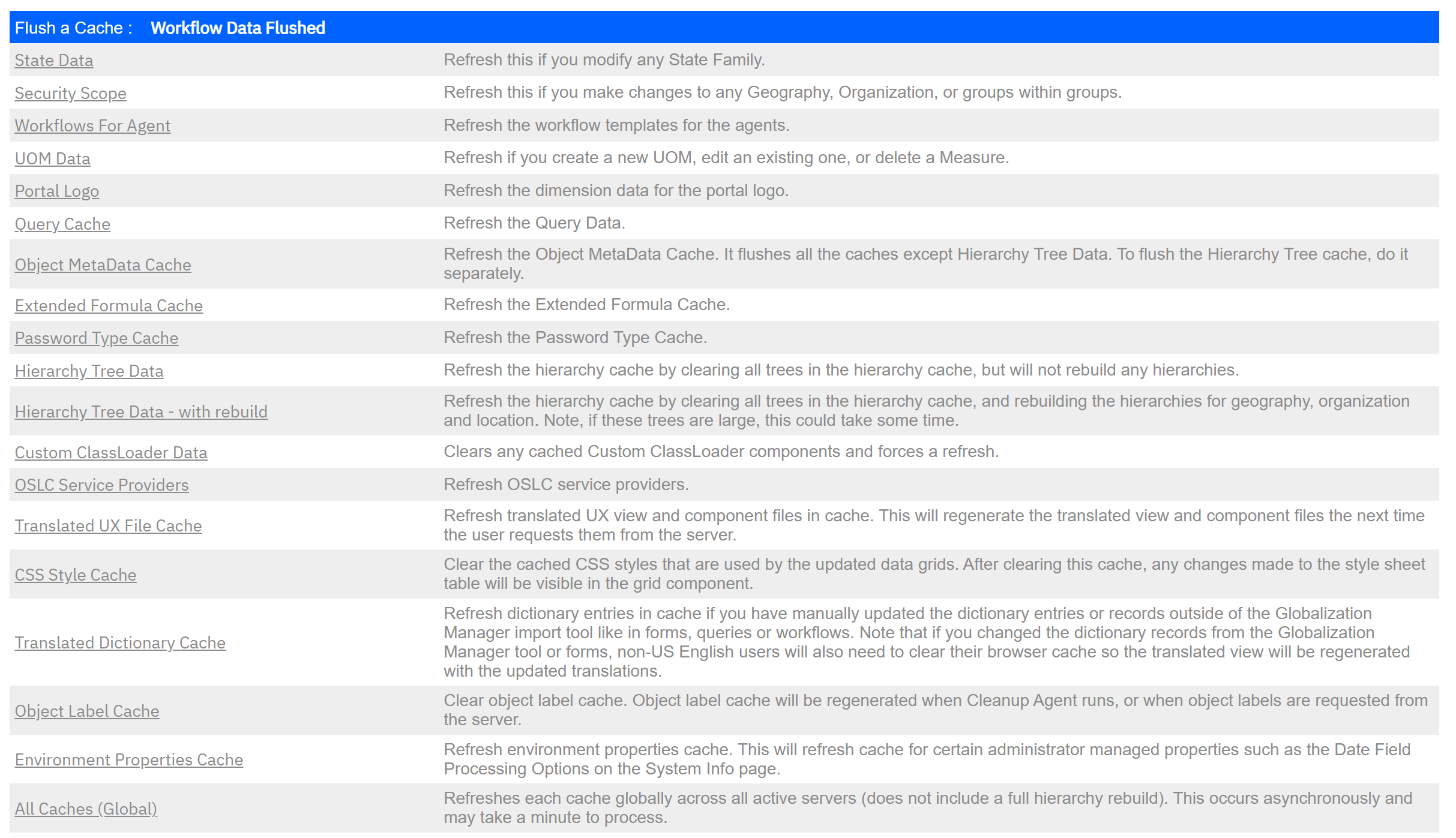
It runs SELECT statements only, which makes it a safe way to see what the screens do not show (events, instances, the raw record). Never fix data with SQL. Configuration goes through the builders, or through packaged, repeatable changes.
Working smarterPop-up windows as dialogs, alerts as messages
The classic builders open many pop-up windows: field properties, maps, pickers, association filters, previews. Each is a separate
browser window, easy to lose behind the main one. Questions come as browser alert() boxes that freeze the page until you
click OK. During this exercise we used a small script, pasted into the browser's developer console, that changes both, only in your
own browser tab:
window.open()→ an in-page dialog (an iframe in a blue frame, with a × to close). Dialogs stack, so a picker opened from a dialog appears on top of it.alert()→ a yellow message strip at the top, which closes itself after 12 seconds or on click, and is also written to the console.confirm()questions ("delete this?", "create a new revision?") stay as normal browser boxes on purpose: those you should read.


The script
Open the builder (for example Form Builder), press F12, go to Console, paste, press Enter. Nothing is sent anywhere and nothing changes on the server.
// MREF / TRIRIGA classic builders: open pop-up windows as in-page dialogs, and show
// browser alert() boxes as an in-page message instead of a blocking box.
// Paste into DevTools console on the builder page. Re-run after a full page reload.
// confirm() questions are left as the normal browser box on purpose.
(function installBuilderHelpers() {
  const top_ = window;
  // Some builders (Report Manager) are a <frameset> page that cannot show anything
  // itself: then put messages and dialogs in its main frame.
  const doc = (top_.document.body && top_.document.body.tagName === 'FRAMESET')
    ? ((top_.frames.frameMain || top_.frames[0]).document) : top_.document;
  const stack = [];                       // open dialogs, last = on top
  const closeTop = () => { const ov = stack.pop(); if (ov) ov.remove(); };

  // 1. alert() -> a message strip at the top of the page (also written to the console).
  const toast = (msg) => {
    console.info('[MREF alert]', msg);
    const t = doc.createElement('div');
    t.textContent = msg;
    t.style.cssText = 'position:fixed;left:50%;top:12px;transform:translateX(-50%);z-index:200000;' +
      'max-width:640px;padding:10px 16px;background:#fff8e1;border:1px solid #f1c21b;' +
      'border-radius:6px;font:14px sans-serif;box-shadow:0 4px 14px rgba(0,0,0,.25);cursor:pointer';
    t.title = 'Click to close';
    t.onclick = () => t.remove();
    doc.body.appendChild(t);
    setTimeout(() => t.remove(), 12000);
  };

  const findFrame = (w, name) => {
    try {
      for (const f of w.document.querySelectorAll('iframe,frame')) {
        if (f.name === name) return f.contentWindow;
        const hit = findFrame(f.contentWindow, name);
        if (hit) return hit;
      }
    } catch (e) {}
    return null;
  };

  // 2. A finished pop-up calls window.close(), sometimes on the top window:
  //    close a dialog, never the tab.
  top_.close = closeTop;

  const hook = (w, ownDialog) => {
    try {
      w.alert = toast;
      w.close = ownDialog
        ? () => { const i = stack.indexOf(ownDialog); if (i >= 0) stack.splice(i, 1); ownDialog.remove(); }
        : closeTop;
      // 3. window.open() -> an iframe in a dialog stacked on top of the page and other dialogs.
      w.open = function (url, name) {
        // window.open(url, 'someFrame') where that frame already exists just means
        // "load into that frame" (Report Manager tabs work this way): do exactly that.
        const existing = name && findFrame(top_, name);
        if (existing) { if (url) existing.location.href = url; return existing; }
        const n = stack.length;
        const ov = doc.createElement('div');
        ov.style.cssText = `position:fixed;left:${3 + n * 2}%;top:${4 + n * 2}%;width:${94 - n * 4}%;` +
          `height:${92 - n * 4}%;z-index:${100000 + n};background:#fff;border:2px solid #0f62fe;` +
          'box-shadow:0 8px 30px rgba(0,0,0,.4)';
        const x = doc.createElement('button');   // manual close, top-right corner
        x.textContent = '×';
        x.title = 'Close this dialog';
        x.style.cssText = 'position:absolute;right:4px;top:2px;z-index:1;border:0;background:#0f62fe;' +
          'color:#fff;font:16px sans-serif;width:24px;height:24px;cursor:pointer';
        x.onclick = () => { const i = stack.indexOf(ov); if (i >= 0) stack.splice(i, 1); ov.remove(); };
        const fr = doc.createElement('iframe');
        fr.name = name || 'pop' + n;
        fr.style.cssText = 'width:100%;height:100%;border:0';
        ov.append(x, fr);
        doc.body.appendChild(ov);
        stack.push(ov);
        // The pop-up talks back to the page that opened it through window.opener: keep that link.
        fr.addEventListener('load', () => { try { fr.contentWindow.opener = w; hook(fr.contentWindow, ov); } catch (e) {} });
        fr.src = url;
        return fr.contentWindow;
      };
      // Builders are built from nested frames: patch every one of them.
      [...w.document.querySelectorAll('iframe,frame')].forEach(f => hook(f.contentWindow, ownDialog));
    } catch (e) { /* cross-origin frame: skip */ }
  };
  hook(window, null);
  top_.__installBuilderHelpers = installBuilderHelpers;   // re-run after a builder panel reloads
  return 'pop-ups open as dialogs; alerts show as a message at the top';
})();
How it works, in plain words
Browsers let a page replace its own window.open, alert and close functions. The builders are
made of nested frames, and each frame has its own copies, so the script walks every frame and replaces them all. When a builder asks
for a pop-up, the script creates an iframe in a dialog instead, and points the new page's window.opener back at the page
that asked, because that is how the pop-up sends its answer back (a picked field, a saved map).
What we learned building it
| Problem | Fix in the script |
|---|---|
A pop-up called top.close() when done, and closed the whole tab. | Replace close on the top window too: it closes the top dialog. |
| Version 1 allowed one dialog. Opening a picker from the field editor replaced the editor. | A stack of dialogs, each offset a little. |
| Report Manager tabs stopped working: they "open" pages into an existing frame by name. | If a frame with that name exists, load the page there, no dialog. |
| Report Manager is a frameset page, which cannot display a dialog. | Put dialogs and messages in its main frame. |
| The report designer and the workflow designer stall inside a dialog. | Open them as a normal browser tab instead (copy the dialog's address to a new tab). Their own pop-ups then work as dialogs. |
| After OK, some dialogs stay open and blank (the page tried to close a window that does not exist). | Click ×. The change is kept: re-open to check. |
It lives in one browser tab: a full page reload removes it, so paste it again (or keep it in a browser snippet). It is a convenience for builders, not a product change, and it is not supported by IBM. If a builder behaves oddly, reload the page without it and try again.
Wrap-upLessons and checklist
- Look for an out-of-the-box answer first. MREF already had key management.
- New objects go into an existing module when Module Level Associations is on. A new module gave us SQLCODE -150.
- Field and association names are global. Reuse with Find; do not invent a second name for the same thing.
- Build in order: object → association → form → queries → workflow → menu item, and publish each one.
- Lists need a System Add action, or users cannot create records.
- Related-records queries need an association filter on
$$RECORDID$$. - Record events need an Asynchronous workflow to choose them, and a Modify Records map takes one source per field.
- Debug with evidence: event history, agents, caches, instances, then the task as saved.
- Clean up failed attempts: retire and delete the objects, forms, queries and workflow drafts you no longer use, so the next admin is not confused.
GlossaryWords you will hear
- MREF / TRIRIGA
- Maximo Real Estate and Facilities is the new name of IBM TRIRIGA; objects starting with "tri" are IBM's originals.
- Module
- A family of business objects that share fields, associations and lifecycle (for example triKeyManagement, Location).
- Business object (BO)
- A record type, with fields, a name mapping and state transitions. Maximo: an object in Database Configuration.
- Publish
- Make a new version of an object, form, query or workflow live. Maximo: Apply Configuration Changes, but per piece.
- Revise
- Open a published item for changes as a new revision; the previous one is retired when you publish.
- State transition
- An action that moves a record from one state to another, such as triSave or triActivate.
- Association
- A named, two-way link between records: Key For / Has Key. Maximo: closest to a relationship, but stored as data.
- Module Level Associations
- A platform mode where each module stores its associations in its own MA_ table.
- Query section
- A form section that lists related records using a query.
- $$RECORDID$$
- In a query filter, the record currently open on the form.
- Asynchronous workflow
- Runs in the background on the workflow agent after the event, not while the user waits.
- Agent
- A background process such as WFAgent or SchedulerAgent. Maximo: a cron task.
- Navigation item / collection
- A menu entry and the menu, panel or quick-link list that holds it.
- Master/Detail
- A page with a list on top and the selected record's form below.
Screens: IBM Maximo Real Estate and Facilities 9.2.2 on IBM Maximo Application Suite, test system with IBM's demo data,
signed in as an administrator. Object names starting with cst are ours; everything else is standard MREF.
The browser script is a personal convenience, not an IBM tool.